Delete ads with pfBlockerNG
Spoiler: To remove ads globally, you should do it at the source, via your network firewall. pfSense hopefully has a package that does it for us and we'll show you how. You will need to install a specific package and setup it. In case of high availability, some additional settings are also required.
Among the arsouyes, like everyone else, we don't like advertisements. They want to manipulate us, waste our bandwidth, pollute the visual environment and even our planet, not to mention all the times they interrupt us outright without warning.
And since these parasites are everywhere, we decided to filter them at the source: via our firewall. That way, whatever the equipment and whatever the application, we can zone out quietly.
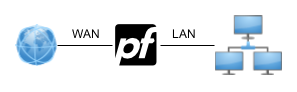
To give you an idea of the network setup, we will start with a classic one. In truth, we use a few VLANs, WIFI connections and whatever is possible with managed switches, but since that doesn't change anything in the configuration that will follow, we prefer to keep it simple.
To set up filtering, you need:
- A firewall with pfSense installed and setup (we tested from version 2.4.4 and 2.6.0),
- WAN, a port connected to the internet provider box (otherwise it doesn't really make sense),
- LAN, a port connected to the rest of your internal network (idem, I don't really see the point of a firewall without a LAN).
Basically, one might be tempted to use the Squid HTTP proxy in transparent mode. By intercepting traffic on the fly, it could then filter out authorized or unauthorized content. The problem is that it is not compatible with TLS connections (unless we insert our own PKI everywhere, but that violates our respect for the confidentiality of our legitimate network packets).
We therefore preferred to go down a layer and filter DNS requests directly with pfBlockerNG. Each time a request attempts to reach an ad server, the firewall will provide a bogus IP address; all destination traffic will therefore be lost in limbo and no ads will be displayed 🎉.
Precision: it works with all applications that use external advertising networks on specific servers (most websites as well as most telephone applications). But it won't work when the ad uses the same server as the legitimate content (i.e. youtube); for these cases you will need to add a module to the browser (i.e. uBlock Origin) or use clones without ads (i.e. NewPipe).
Setup
For this setup, we assumed that your pfSense is installed, setup and that your network is working. Whenever you change parameters, don't forget to click on save (it seems obvious, but this precision proved useful).
The DNS resolver
You must then activate the DNS Resolver. It is found in the services / DNS Resolver menu. Most fields are left as is. Here are the values we have chosen:
- Enable is checked, of course,
- Listen Port is left by default (53),
- Network Interfaces is All because we find it convenient that everyone can use it,
- Outgoing Network Interfaces is at WAN since that's where everything goes (check them all if you have more than one),
- DHCP Registration and Static DHCP aren't useful for ad blocking, but we checked them because it's more convenient for pinging machines.
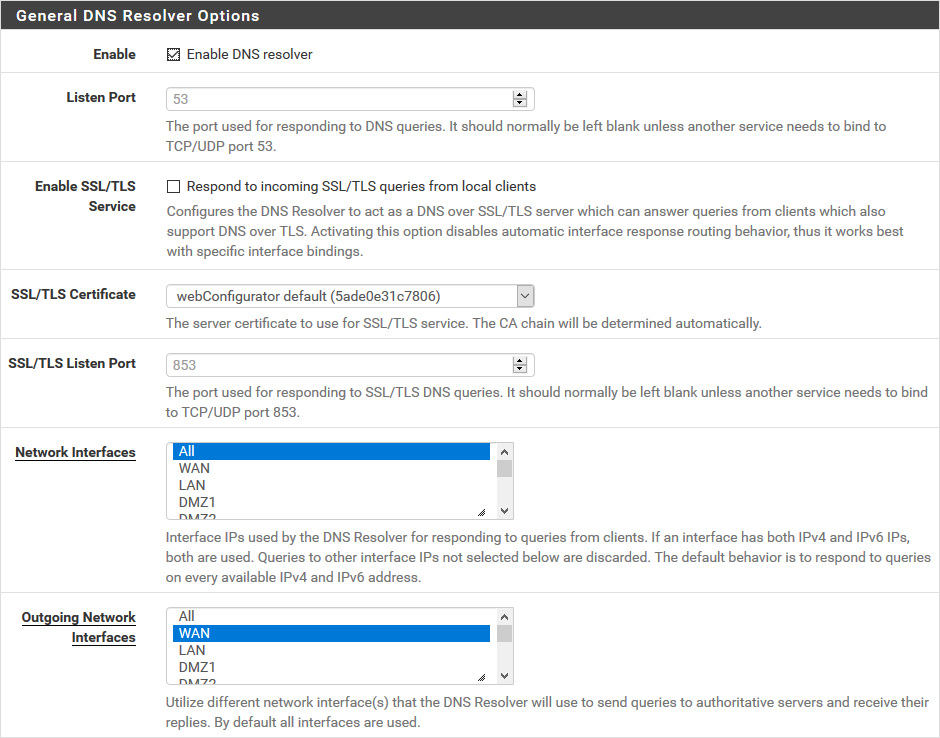
You also need to make sure that your DHCPs are using the firewall's IP as the DNS server. On pfSense, nothing could be simpler, just make sure that the DNS servers field is left empty.
Without being necessary for ad blocking, other DNS settings may interest you:
- Force resolution rather than forwarding, useful if you don't trust ISPs and necessary if you have two exits to the net (uncheck the DNS Query Forwarding box) .

- Activate DNSSEC, to be sure that the replies received are the correct ones (and when the sysop of the corresponding domain has activated it).

Installing the package
You must first install the pfBlockerNG package. For that, go to the menu System / Package Manager. Click on Available Packages and enter the package name in the search bar. All you have to do is click on the +Install button, confirm and wait.
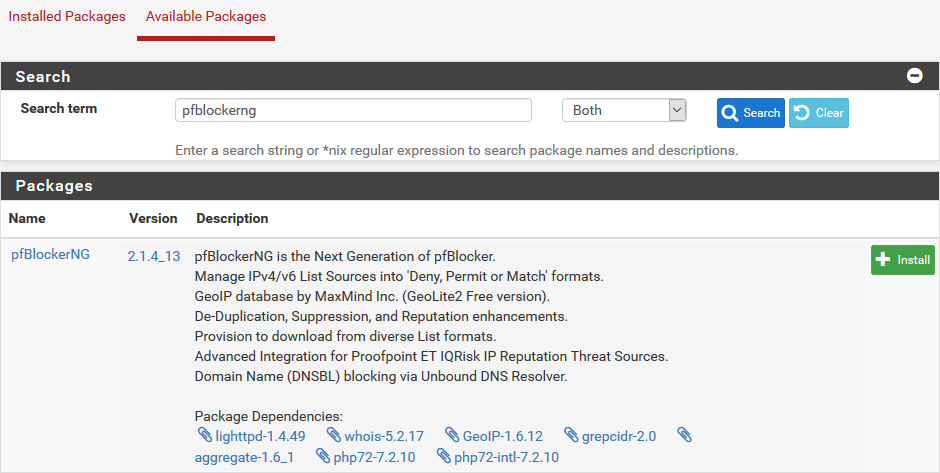
With our version of pfSense, it is version 2.1.4_13 of the package that we installed (and a 2.1.4.26 on our pfSense in version 2.6.0). Depending on the version, the menus are sometimes different and will require some adaptations, but the general idea remains the same.
DNSBL
We can now setup the DNS lists. This time, it's via the Firewall / pfBlockerNG menu then the DNSBL tab. In the basic configuration, only the following three fields require our attention:
- Enable DNSBL is checked, of course,
- Enable TLD is checked,
- DNSBL Virtual IP is at 10.10.10.1, it must be a private address and not assigned by you (otherwise the packets will arrive at this unfortunate machine),
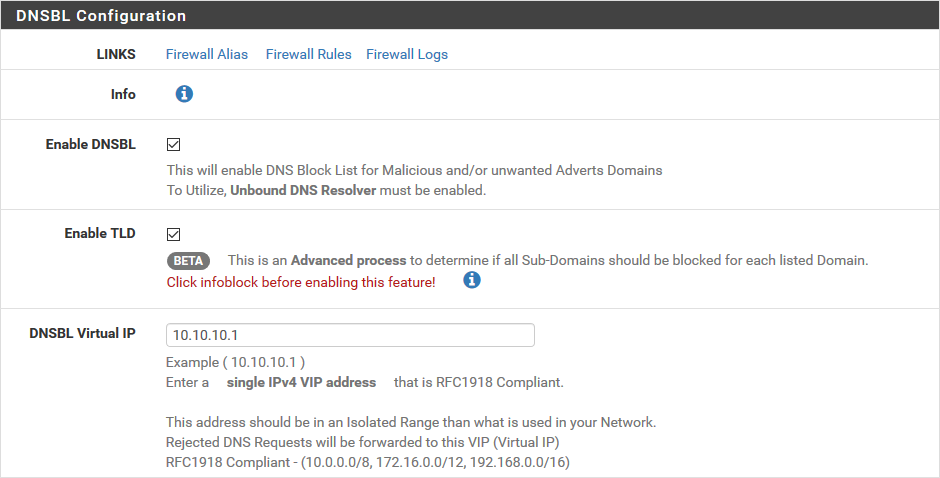
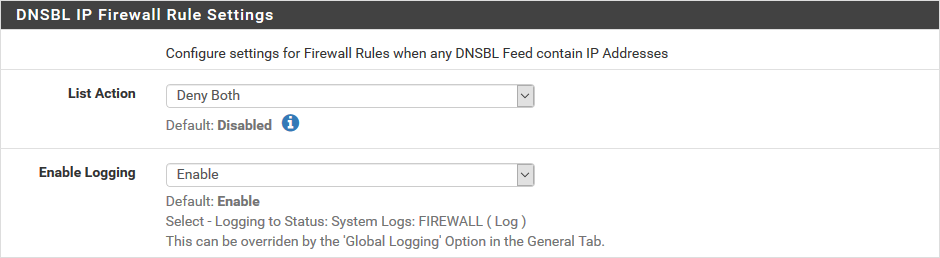
Don't forget the following section on firewall rules to tell it to block these domains:
- List Action is at deny both
DNSBL Easy List
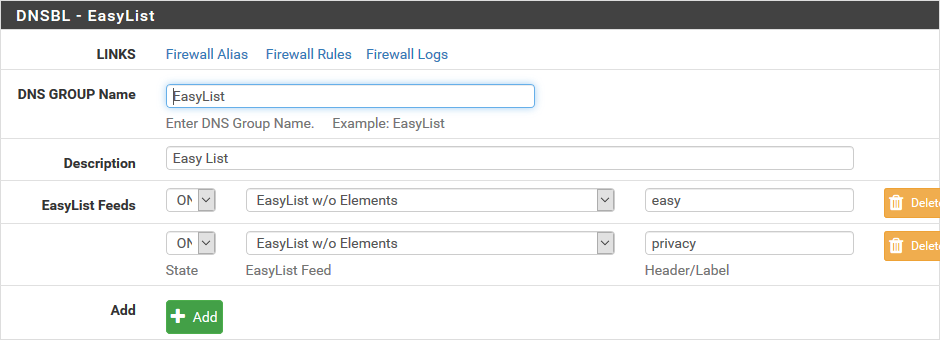
We then move on to retrieving the lists of domains to block, starting with the pre-configured ones. Same place but we change the tab to DNSBL EasyList. We start with choosing the lists:
- DNS GROUP NAME and Description are only intended to allow you to find them in the conf. So we put EasyList in both,
- EasyList Feeds, the state is ON, we add two (EasyList w/o Elements and EasyPrivacy), the header is only to help you recognize who’s who (we put easy and privacy),
Then setup their content and way of updating them:
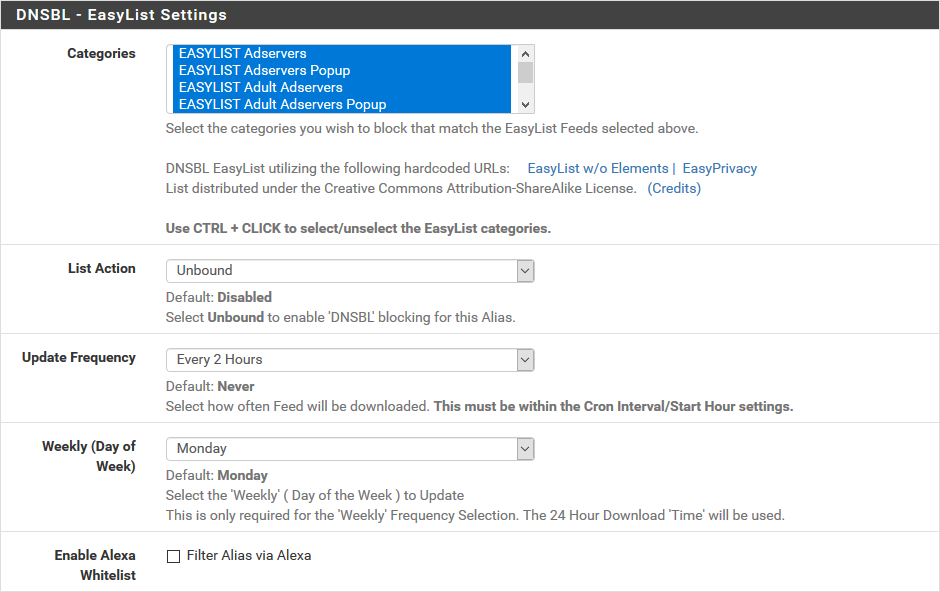
- Categories we’ve chosen them all,
- List Action is at unbound,
- Update Frequency is at your discretion, personally we put Every 2 Hours in the capture but in real life, we are on Once a day.
DNSBL Feeds
If you want, you can always add other lists, to be even more complete. This time it's the DNSBL Feeds tab. Here are some links that we have found useful.
http://someonewhocares.org/hosts/hosts
https://adaway.org/hosts.txt
http://sysctl.org/cameleon/hosts
Keep the state field to on and the action to unbound to be able to block. For the update frequency, we chose every two hours in the capture, and once a day in real life.
The Header/Label field to the right of the addresses (source field) allows you to add a small description to your lists to remind you what they are used for. Only put letters, if you put dots, it won't pass...
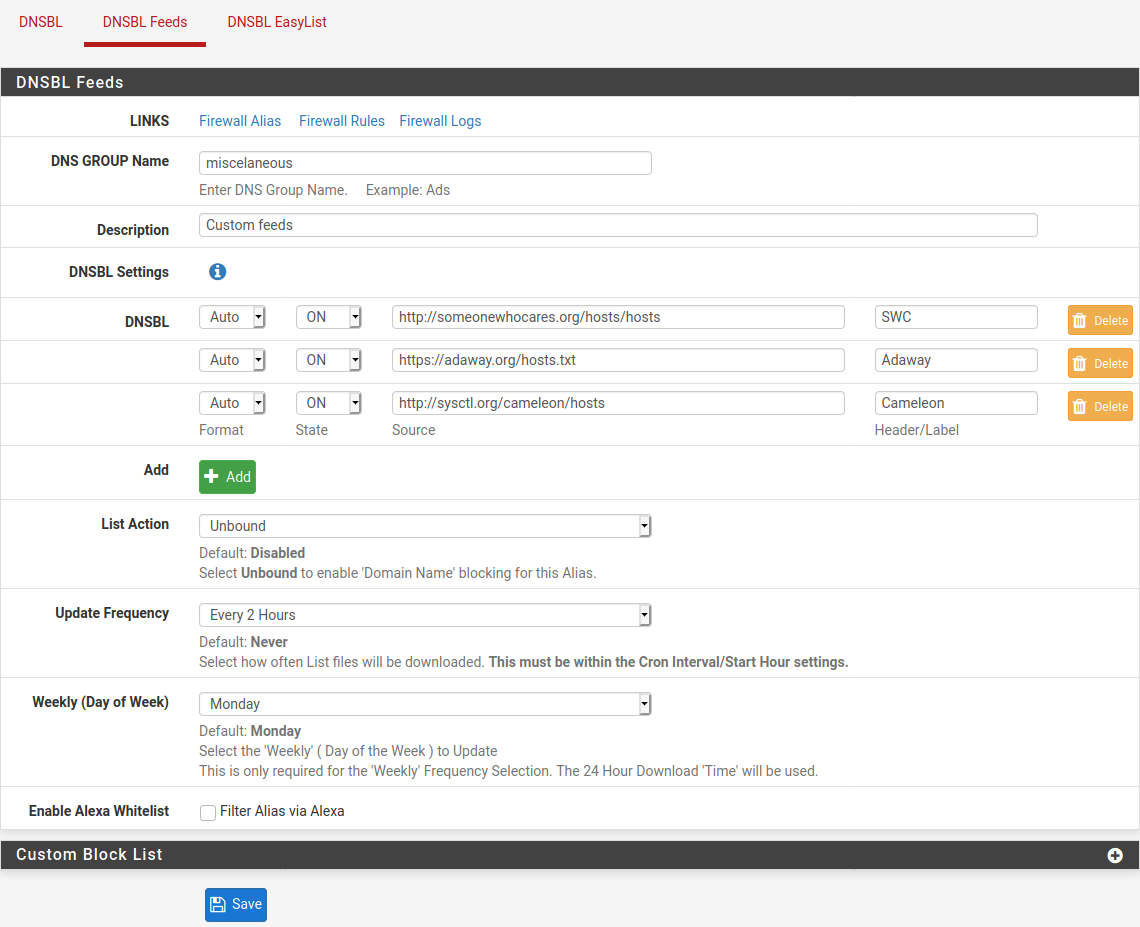
And while we were at it, we also added some malicious domain lists:
https://isc.sans.edu/feeds/suspiciousdomains_Low.txtWe are then left with two lists configured:

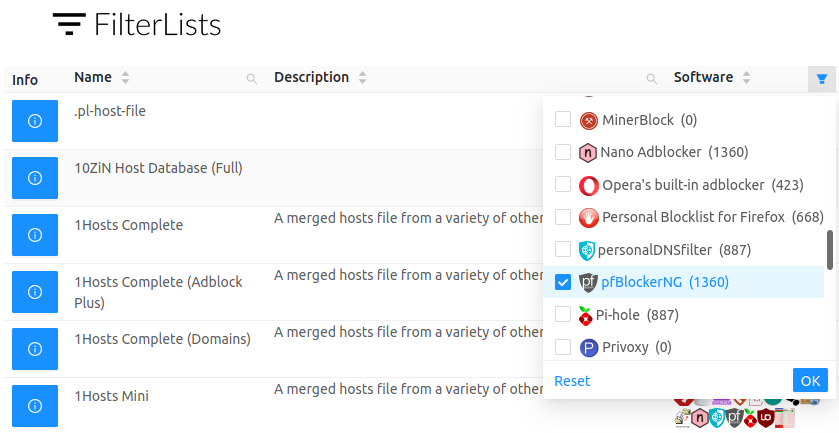
For those who still want more, filterlists.com offers a whole bunch of lists of domains and IPs that you could block. As these lists are not always compatible but you can filter the Software field to only keep pfBlockerNG.
pfBlockerNG
Depending on your versions, pfBlockerNG may not be enabled by default. In this case, it shows relatively quickly: the DNS resolutions of the advertising domains work, and the update process does not start.
To activate PfBlocker-NG, super easy: via the Firewall / pfBlockerNG menu (General tab opened by default), you must check the Enable pfBlockerNG box.

Check everything
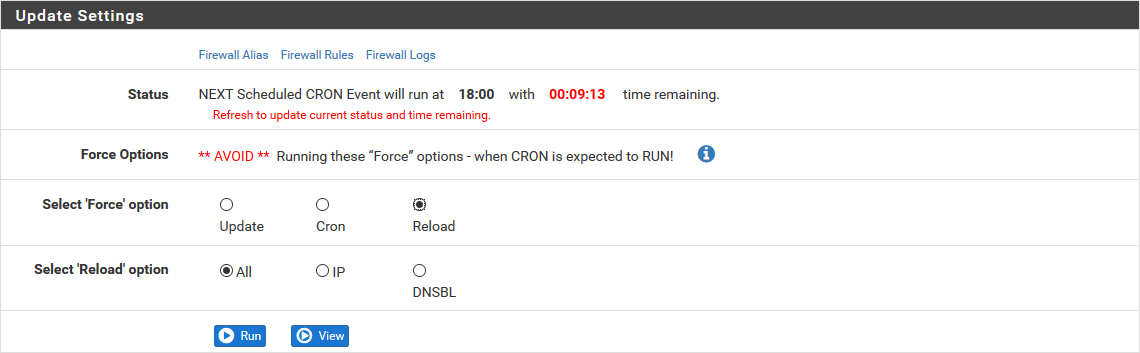
Rather than waiting for the next automatic execution, we will ensure that the setup is valid and in place. It is via the Firewall / pfBlockerNG menu then the Update tab. For the Force option, we choose Reload, and in the new Reload option, we choose All. We click on the Run button.
And for checking at the client side, nothing better than nslookup with a known advertising domain.
tbowan@io:~$ nslookup analytics.yahoo.com
Server:         192.168.1.1
Address:        192.168.1.1#53

Name:   analytics.yahoo.com
Address: 10.10.10.1
High availability
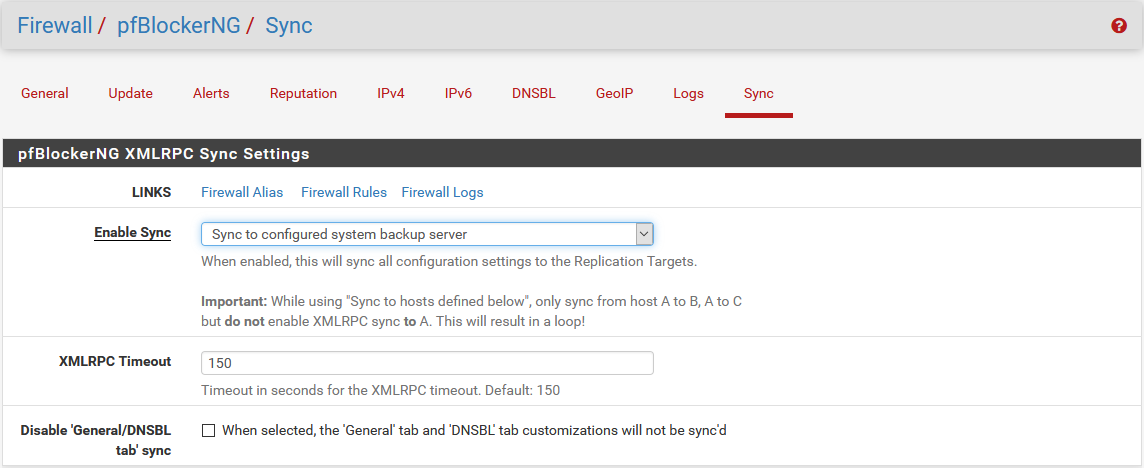
So far, everything is fine on your server but if you have several, setup in high availability, there are a few more things to do...
By setup high availability, you might think that everything will fall into place on its own, but no. Synchronization done by high availability does not include packages like pfBlockerNG which need to be tuned individually (when they have the right options).
On Slaves
You must install the pfBlockerNG package manually on each server. Once installed, do not touch it, synchronization will be done by the master.
On Master
Don't look for the pfBlockerNG (or equivalent) option in the High Availability setup, that's not where it's going...
To enable synchronization, go to the Firewall / pfBlockerNG menu then Sync tab (last one) and setup a single field:
- Enable Sync, choose Sync to configured system backup server and shortly after, all configuration screens of your slave will conform to the master.
Good to know
Even if the synchronization updates the configuration, it does not update the database, which is done independently on each machine via a scheduled task.
If you need to test your setup and compare the results between the members of your cluster, I advise you to perform a manual update of the database beforehand to avoid surprises.
After that ?
With this system, advertising areas are now empty and applications that contain ads are finally usable. One can leave a child with a tablet without worrying about the advertisements he will encounter and click on.
For the web, and to prevent unsightly empty areas from remaining on pages, we have found nothing better than uBlock Origin, an extension that removes ads for Firefox, Chrome , Opera and Edge.
For apps that circumvent this system by running their ads through their own network connections (i.e. youtube, I see you), all that remains is to find cleaned versions (i.e. NewPipe).