Set up a backup with Duplicity & OVH Cloud
Spoiler: As it's best to do it before it's too late, we show you how to use duplicity to back up your data to the OVH cloud.
This article updates and replaces the articles "Data backup at OVH with duplicity" and "Recovery of data saved at OVH with duplicity", obsolete since the switch to version 3 of the Keystone API at OVH on March 24, 2020.
Whether you are an individual or a business, data loss is something to fear. Aside from being unrealistically optimistic, you've probably started to think of a way to synchronize your data on a remote system.
And us too, we fear the loss of our data. To prevent this, our important files are first saved on our NAS. This is equipped with hard drives in RAID, to prevent hardware problems. But this does not prevent fires, nor cryptolockers. To do this, we send them every night, in an incremental and encrypted manner, to a server at Gravelines (North of France). How did we do it? This is the subject of our article today.
If you followed our previous article that you put it into practice, you should have received an email from OVH. It said that on the 24th march 2020, the Keystone API will be upgrade from 2 to 3 and the v2 will not be available anymore . This article is therefore obsolete, so here is a revised, improved and expanded version of it.
OVH Side
We decided to use the Object Storage from OVH. This is storage space where you pay per space used.
For information, Object Storage is part of the Public Cloud range, which is a professional offer from OVH. You will not be able to order one and obtain it immediately, OVH will ask you for a copy of an identity document before validating the opening of your service.
Once your Public Cloud will be open, you can find it by clicking on Public Cloud, in the bar at the top of the screen of your OVH management interface.

Creating a container
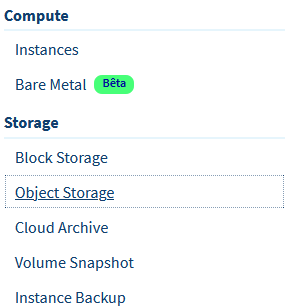
In order to be able to deposit your data, you must first create a container. To do this, click on Object Storage in the menu on the left of the screen.
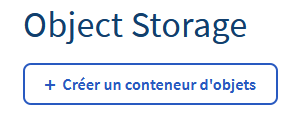
Then click on Create an object container.
The interface will then ask you to choose the location of your container. Select one not too far from where you live and click on Next.

Choose the type of private container and click Next.
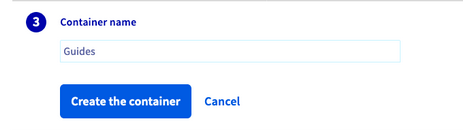
Finally, give it a name and click on Create the container.
You can then find your container in the list, in the Storage / Object Storage menu.
Creating a user
Now that you have a container to drop your files into, you need a user to access it.
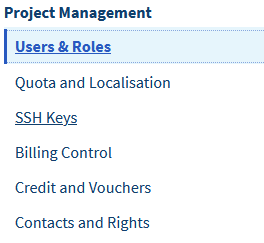
In the Project Management section, click Users & Roles.
Next, click on «Add user» and give it a description.
The next screen will concern the role of the user being created. In order to be able to determine which role is appropriate, we refer to the matrix of roles provided by OVH. We're going to use duplicity with the OpenStack / Swift API, so we need to look at the line aboutswift. The only two possible roles are administrator and objectStore operator. As we prefer to use the policy of least privilege, we will therefore be satisfied with ObjectStore operator.
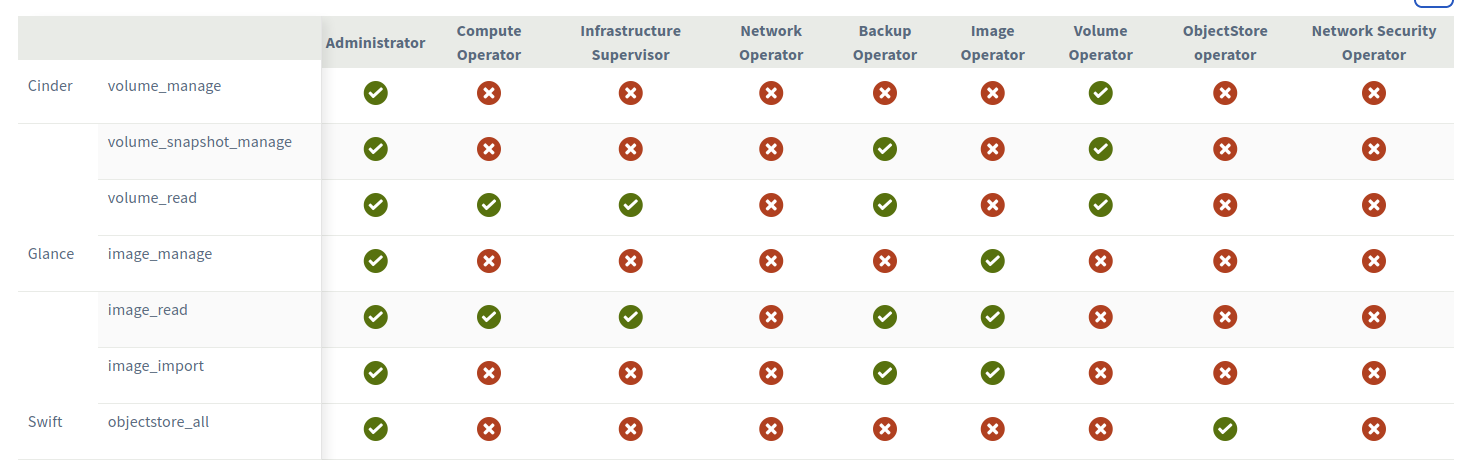
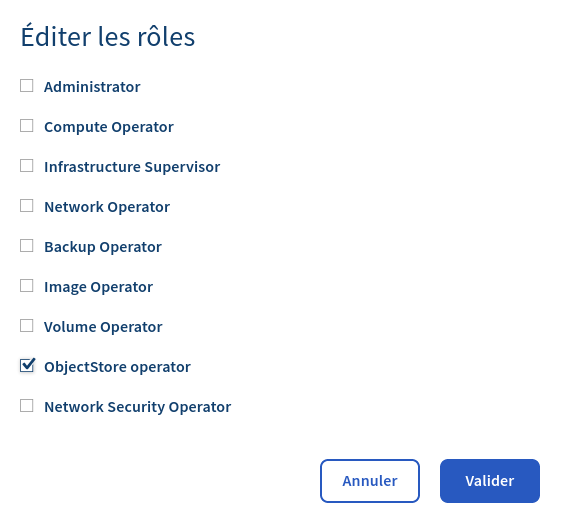
So give the ObjectStore Operator role to your user.
The interface will then show you a password that it is ESSENTIAL to write down (it is not possible to recover a forgotten password, you will then have to regenerate it). Also note in passing the name of your user.

In our case, the user created by OVH is called exgbvthv53G7. And for the smart guys who are wondering, the user was created for example ... So no need to try to recover my backups with him ...
Retrieving important information
The technology used by OVH for its Cloud system is OpenStack. Usually, the constants needed to use OpenStack can be found in a file named RC. The same goes for OVH.
We will therefore retrieve the OpenStack RC file corresponding to our context via the OVH interface.
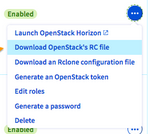
To download the file, go to the Project Management / Users & Roles list of users, click on the three small dots to the right of the user you just created, then on Download OpenStack RC File.
Then select the data center (datacenter) where your container is located and click on Download.
Note the following data:
OS_USERNAME: the username (must match the one you created),OS_TENANT_NAME: This is the project number, you can find it in the Horizon interface (OVH Cloud specific management interface),OS_REGION_NAME: the data center where your container is located.
Backup server side
Now that we have done everything we need on the OVH side, we are going to tackle the machine that will send the backups to OVH.
Installing packages
The first thing to do is to install duplicity and the various necessary dependencies.
apt-get update && apt-get install duplicityThen use pip to install the python modules required by duplicity:
python-keystoneclientfor OpenStack authenticationpython-swiftclientfor storage
pip install python-swiftclient python-keystoneclientKey generation
The second step is to generate the keys used for the encryption and for the signature.
Following the recommendations of [RGS v2.0, appendix B2] (https://www.ssi.gouv.fr/uploads/2014/11/RGS_v-2-0_B2.pdf), we have therefore created two keys, one for encryption and one for signing.
RuleUsage-1. The use of a key must be unique.
Justifications:
- Using the same key for more than one purpose, for example to encrypt with a confidentiality mechanism and ensure integrity with a different mechanism, is a source of many errors. However, this does not prevent the derivation of two keys from the same source key provided that the derivation mechanism complies with the repository, nor of setting up an authenticated encryption mechanism where encryption and authentication are provided by a single mechanism. which has been specially designed for such use and not by two separate mechanisms.
- The use of the same key pair for more than one purpose, for example to encrypt and sign, is also a serious source of errors.
The RGS, appendix B2
gpg being installed by default onubuntu and debian type systems, in order to generate the keys, we usegpg twice in a row and let ourselves be guided by the key creation tool.
gpg --full-gen-keyFor our part, we have chosen to use 4096-bit keys, because it is recommended by Ubuntu.
In the case of an RSA key, today (2016) it is strongly recommended to use a key with a minimum length of 4096 bits!
See "Primary keys should be DSA-2 or RSA keys, 4096 bits or more (preferably RSA) ”or the interview with Phil Zimmermann [de], the inventor of PGP, who in 2013 already recommended a minimum length of 3072 bits for RSA keys.
Ubuntu
You can then display your keys with the command.
gpg --list-keysScripts
These are scripts performing backup, listing files, recovering one or all files.
Common base
All of our scripts will require some common information, such as container connection data or key information. To keep things simple, we have chosen to create scripts that we will include in every script that we do.
swift.sh
All of our scripts will start with the same header, containing the different constants for accessing our container. We will therefore create a swift.sh file containing the following information:
SWIFT_USERNAME, the name of the swift user. This is the user you created earlier, and whose name you can find underOS_USERNAMEin the RC file you downloaded,SWIFT_PASSWORDis the password of your user that you noted when creating this one,SWIFT_AUTHURLis the url to connect to your container via Swift. Since March 24, 2020, this one is https://auth.cloud.ovh.net/v3,SWIFT_AUTH_VERSIONis the version of swift used, ditto, since March 24, it is version 3,SWIFT_TENANTNAMEis the number of the swift project. You cannot invent it, but you will find it under the valueOS_TENANT_NAMEin the RC file,SWIFT_REGIONNAMEis the region. This is the datacenter you have chosen, but you can also find the value inOS_REGION_NAMEof the RC file.
The swift.sh script:
export SWIFT_USERNAME=<username>
export SWIFT_PASSWORD=<password>
export SWIFT_AUTHURL="https://auth.cloud.ovh.net/v3"
export SWIFT_AUTHVERSION="3"
export SWIFT_TENANTNAME=<tenantname>
export =<regionname>
The swift.sh script is meant to be included, so it doesn't start with #!/Bin/sh
gpg.sh
We need to store the keys used for encryption and for signing somewhere, but also the corresponding passphrases. This is because duplicity, in incremental mode, must first retrieve the data from the remote server before it can perform the comparison and determine whether the files are already present on the cloud storage or not. For that, it needs the passphrase of your encryption key to be able to decrypt the data present on the server.
The gpg.sh file contains all the information necessary for using GPG:
ENCRYPT_KEY, the identifier of your encryption key. These are the last 64 bits of the public key exponent. To find it, you just need to take the last 8 characters of the exponent of your key,SIGN_KEY, same thing for the signature key,PASSPHRASE, the passephrase of your encryption key,SIGN_PASSPHRASE, that of your signature key.
The gpg.sh script.
export ENCRYPT_KEY=<clef_chiffrement>
export SIGN_KEY=<clef_signature>
export PASSPHRASE=<passphrase de la clef de chiffrement>
export SIGN_PASSPHRASE=<passphrase de la clef de signature>
backup.sh
This script allows you to send the data you want to backup to your container at OVH.
send.sh
In order to send the data to the remote server, duplicity is configured to use swift, make incremental backups and copy symbolic links. For the more curious, here is the complete detail of the options passed to duplicity:
--full-if-older-than 1M: make a full backup if the last one is more than one month old,--copy-links: copy the files pointed to by the symbolic links,--encrypt-key: the encryption key,--sign-key: the signature key,--num-retries 3: try again 3 times if error,--asynchronous-upload: prepare the next upload while uploading the current file,--cf-backend swift: use of swift,--volsize 100: reduce the size of packets sent by duplicity.${1}: get the first argument passed in the command line, which must contain the path of the directory containing the data to be saved,${2}: get the second argument of the command line, which must contain the address of your OVH container.
The send.sh script.
duplicity --full-if-older-than 1M\
                --copy-links \
                --verbosity notice \
                --encrypt-key "$ENCRYPT_KEY" \
                --sign-key "$SIGN_KEY" \
                --num-retries 3 \
                --asynchronous-upload \
                --cf-backend swift \
                --volsize 100 \
                "${1}" "${2}"
remove.sh
In order not to overload the disk and end up with a huge amount of data, going too far back in time, we will use duplicity once again, telling it to delete backups older than 2 months:
remove-older-than 2Mremove files older than 2 months--forceforce the command to be performed${1}: get the first argument from the command line, this should contain the address of the swift container.
The remove.sh script.
duplicity remove-older-than 2M --force "${1}"the script
The backup.sh script ultimately becomes a suite of inclusion of the right scripts, one after the other, preceded by information on the address of the container and the directory containing the data to be backed up:
sourceis the directory containing the data you want to backup,destinationis theswiftcontainer address. Take the name of your container that you created earlier (in our example, we called it savements) and prefix with swift:// (in our case, it will be swift://backups).
#!/bin/bash
src=<source>
dest=<destination>

source swift.sh
source gpg.sh
source send.sh $src $dest
source remove.sh $dest
list.sh
This script will list all the data you have in your container.
list-files.sh
In order to retrieve the list of files present on the remote server, you must use duplicity with thelist-current-files option:
-t 1D: get the backup from a day ago. To modify if you need to find older backups,list-current-files: askduplicityto list the files stored on the remote server,--encrypt-key: the encryption key,--sign-key: the signature key,--cf-backend swift: use ofswift,${1}: get the first argument passed in the command line, that is to say contain the address of the OVH container.
duplicity -t 1D list-current-files --encrypt-key "$ENCRYPT_KEY" --sign-key "$SIGN_KEY" --cf-backend swift ${1}the script
The listing script once again returns to an inclusion list of good scripts, preceded by the address of the OVH container from which you want to retrieve the list of files:
<source>is the swift container address (to find it, see script on the backup),
#!/bin/bash
src=<source>

source swift.sh
source gpg.sh
source list-files.sh $src
recover-all.sh
This script is used to recover all the data contained in your backup container. Be careful, it can take a long time if you have a lot of files.
recover.sh
In order to recover all the files present on the server, you must once again use duplicity:
-t 1D: get the backup from a day ago. To modify if you need to find older backups,--encrypt-key: the encryption key,--sign-key: the signature key,--cf-backend swift: use ofswift,${1}: get the first argument passed in the command line, which must contain the address of the OVH container.${2}: get the second argument passed to the command line, which will contain the path to the directory where you want to retrieve the data
duplicity -t 1D --encrypt-key "$ENCRYPT_KEY" --sign-key "$SIGN_KEY" --num-retries 3 --cf-backend swift "${1}" "${2}"the script
In the end, the script will contain information about the container, the path to where the data should be retrieved, as well as the inclusion of all the necessary scripts:
<source>is the swift container address,<dest>is the directory in which you want to recover your files
#!/bin/bash
src=<source>
dest=<dest>

source swift.sh
source gpg.sh
source recover.sh $src $dest
recover-one.sh
This script is used to recover a particular file.
recover-file.sh
duplicity will be used with thefile-to-restore option:
--file-to-restore: request to recover a file or a directory,-t 1D: get the backup from a day ago. To modify if you need to find older backups,--encrypt-key: the encryption key,--sign-key: the signature key,--cf-backend swift: use ofswift,${1}: get the first argument passed in the command line, which must contain the address of the OVH container.${2}: get the second argument passed on the command line, which will contain the path to the directory where you want to retrieve the data${3}: get the third argument passed to the command line, which will contain the name of the file or directory to retrieve.
duplicity -t 1D --file-to-restore ${3} --encrypt-key "$ENCRYPT_KEY" --sign-key "$SIGN_KEY" --cf-backend swift ${1} ${2}the script
The last script that we offer you therefore contains the information necessary to connect to the container, the place where you want to retrieve your data, the file you want to retrieve, then includes all the necessary scripts.
<source>is the swift container address (to find it, see script on the backup),<dest>is the directory or the file in which you want to recover your directory or your file<file>is the path in the container to the file (or directory if applicable) you want to recover.
#!/bin/sh
src=<source>
dest=<dest>
file=<file>

source swift.sh
source gpg.sh
source recover-file.sh $src $dest $file
Et après
From now on, as soon as you use these scripts, you can send or retrieve your data from OVH. If you want to automate everything, feel free to use cron.
Remerciements
Sylvain S. for proofreading and correcting typos that had crept into the article.