Backdoor via the Windows login screen
Spoiler: To show you that physical access is administrator access… Here is a small example of how to launch a command prompt from the Windows login screen. We’re going to mount the Windows partition on a Linux system and add a backdoor to the Windows login screen. This will provide us with a command prompt to change a password or activate the administrator.
A flaw often encountered by IT professionals new to risk analysis is to focus on informatics problems: Software, systems and networks. To the detriment of other components that are essentially obvious, such as physical access to machines.
With a little bit of experience, all consultants and experts will tell you the same thing:
An attacker with physical access is de facto administrator of the machine.
A cyber expert
But between saying it and really feeling this implication, there is still a gap.
Today, we will therefore try to fill it by showing you an example of what it is possible to do, when you have physical access to a computer running Windows 10.

Mount the hard drive
Since we assume that you have physical access to the machine, and
that you are in a hurry, we will go through a Live CD. Any in
our case since we’ll only be using basic tools
(fdisk,mount and cp).
As you will see, this technique works the same if you take the time to unplug the drive to plug it into a specific machine. In the context of expertises, we sometimes use it on clones of disks.
Locate the device
To mount the correct drive, you first need to know which device file
it corresponds to. For that, we use fdisk.
sudo fdisk -lA SATA or SSD hard drive will be in /dev/sd…, an IDE
drive /dev/hd…. To be sure it’s the right one, you can
check the disk name (Windows i.e. spelled out), size, or any
other useful information.
Once you have the disk, you have to find out what the primary partition is. To do this, use the file system (i.e. NTFS) and the size. The small partitions (500 MB to 1 GB) do not interest us. Apart from extremely rare cases, the overall space will only be distributed over one (it is the right one) or two (the first is often the right one, the second being used for personal files).
With a 50 GB disk and via a Live CD, this is what
fdiskreturns to me.sudo fdisk -l [...] Disque /dev/sda : 50GiB, 53687091200 octets, 104857600 secteurs Unités : secteur de 1 x 512 = 512 octets Taille de secteur (logique / physique) : 512 octets / 512 octets taille d'E/S (minimale / optimale) : 512 octets / 512 octets Type d'étiquette de disque : dos Identifiant de disque : 0xf20716a0 Périphérique Amorçage Début Fin Secteurs Taille Id Type /dev/sda1 * 2048 1026047 1024000 500M 7 HPFS/NTFS/exFAT /dev/sda2 1026048 103149588 102123541 48,7G 7 HPFS/NTFS/exFAT /dev/sda3 103151616 104853503 1701888 831M 27 WinRE masquéThe
/dev/sdadisk is a good candidate. Its size corresponds (50GiB) and its name is evocative (back). Of its three partitions, two are too small, so it’s/dev/sda2that interests us.
Mount the hard drive
To do things properly when mounting a hard drive, you usually need to
create a directory to act as a mount point. For the sake of cleanliness
and automation, we generally use the fstab file …
Here, we will go to the fastest and directly mount the hard drive in an existing compatible directory (empty and not used for anything useful). If you are unsure, you can also create your own directory.
sudo mount <peripherique> <repertoire>To come back to our example of the 50GiB disk and our Ubuntu, we will directly use
/media.sudo mount /dev/sda2 /media
Common problems
Ideally, the previous lines work on their own without problems. But since the world isn’t always fair, here are some common problems and their solutions.
Hibernation
If Windows was not turned off but asleep when you booted from the live CD, i.e. it is in hibernation. Consequence: Linux will refuse to mount your drive in Read / Write. You will then get the following error message:
The disk contains an unclean file system (0, 0).
Metadata kept in Windows cache, refused to mount.
Falling back to read-only mount because the NTFS partition is in an
unsafe state. Please resume and shutdown Windows fully (no hibernation
or fast restarting.)
Basically, you can stop your live CD, reboot into Windows, and shut it down cleanly. Now that the system is in good condition, you can mount the disk.
Alternatively, you can also use ntfsfix on the device to
fix the problems itself. You will have to unmount the partition first,
but other than that, it’s easy to use:
sudo ntfsfix <peripherique>Finally, despite everything you might read in the man pages, the
mount option remove_hiberfile does not
work with Windows 10. You have been warned.
Unsupported reparse point
As of Windows 10 update 14393, the free NTFS driver NTFS-3G used to mount these partitions is no longer compatible and has a bug. Instead of allowing access to all files on the Windows partition, some files are in error (indicated by “unsupported reparse point”).
ls -l /media/Windows/System32/cmd.exe
ls -l Windows/System32/cmd.exe
lrwxrwxrwx 2 .. .. 23 Aug 15 12:21 Windows/System32/cmd.exe -> unsupported reparse point
You will then have to replace your drivers with an updated version.
Install the backdoor
To put it simply, we are going to replace one of the executables that can be used via the home screen by the command prompt. We have the choice.
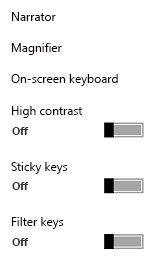
Ease of Access which launch the binary
C:\Windows\System32\Utilman.exe via the following icon (a wheelchair?).
The magnifier , to be a little more stealthy, leave
the ergonomics options unchanged and prefer to change the Magnifier
(which starts via the ergonomics options). Its binary is
C:\Windows\System32\Magnify.exe.

As a precaution, it may be interesting to save the original binaries by copying them elsewhere (useful for restoring if necessary).
Then it’s just a matter of replacing the binary you chose with the one from Command Prompt.
cp \
    <pointdemontage>/Windows/System32/cmd.exe \
    <pointdemontage>/Windows/System32/Utilman.exe
And There you go ! From now on, from the home screen, by clicking on the Ease of Access options, you will get a command prompt.
After that ?
You might think that a command prompt isn’t very useful. Here are some small ideas of things to do to go further.
Change the password
At the very least, those of local users. To spoof their sessions or prevent them from connecting. If the post is part of a domain, chances are even that a local account exists but will never be used (so much for stealth). For that, a command line could not be simpler:
net user <user> *Activate the local administrator
Because by default, Windows creates an administrator user but for security disabled. By reactivating it, you can use it for your subsequent connections. The order is not much more complicated …
net user administrator /active:yesIn the login screen, you can then use this account to log in …
Repair everything
You have changed your Windows, you have an active administrator account, and you have changed its password. The backdoor doesn’t really serve you anymore and you could remove it.
Using Windows, replacing the binary with its backup is painful because there are protections (trusted installers) to play with. It is possible, but painful.
Our advice, go back to linux, mount the hard drive and make the copy as before.
And after ?
If you think that putting a password on your BIOS to prevent booting on another system, you are on the wrong track because as long as your attacker has a little time, he can very well open the tower and then, at choice:
- Mount the disc on your own machine,
- Remove the CLEAR CMOS jumper which will reset the BIOS.
The only two solutions to prevent an attacker from gaining access to your systems are therefore to control access and encrypt the content.
- Access control to the building or to the room in which the station is located, so that only authorized personnel can access it. Keys, badges, digicodes, biological recognition,… On the other hand, unthinkable when roaming.
- Encrypt the disk so that, even with physical access, it cannot be read or modified. You will then have to activate Bitlocker if it is available (i.e. Windows 10 professional) or use third-party tools (e.g. TrueCrypt or VeraCrypt).
Note that these measures do not make the system inoperable (there is always a small door somewhere) but, as you level up, you eliminate more and more attackers.
Personally, I use these backdoors on copies of hard drives made from judicial seals, because I rarely have the password of the defendant. I am therefore very happy that the hard disk encryption is not automatic.