Sharing 4G via Wifi, WISP and TL-WR710N
Spoiler: After having used ADSL for a long time, as a primary connection then as a backup one, it’s time to switch to new technologies and, why not use 4G as a backup connection? Nothing very complicated, you just have to configure the box in WISP and then make sure that its IP parameters are compatible with the firewall.
As we cannot live without an Internet connection, we had set up an ADSL backup connection which we were quite happy with.
Until our main ISP’s offer runs out. We then converted the backup ADSL connection to a main fiber connection and planned to find a new backup ISP.
Except that we took our time. Too much time … Most ISPs are now exclusively in fiber (in France, when an ISP provides fiber in your zone, they no longer offer you ADSL) and those who are not available for fiber yet have tariffs comparable to 4G boxes (and more expensive than fiber).
As it is after all a backup connection, which is used at most 3 times a year and should not exceed 5 GB in total, we thought that it would be more than enough and much more economical to use a silly mobile connection…
We have therefore dusted off the “connection as a last resort” section of our Disaster Recovery Plan. It said from memory:
In the event of failure of both fiber and ADSL connections, share the connection of a smartphone in Wifi and use the TL-WR710N mini-router in WISP mode to provide the connection to the firewall.
Old DRP of the arsouyes
The “procedure” a little more complete that we offer today is done on our TL-WR710N box but the principle is valid (and therefore adaptable) for any other router which offers a WISP function.
Preliminary, Wi-Fi sharing
Starting point, you must of course have an internet connection via your phone (whether in 3G, 4G or 5G).
You must then Share it via Wifi. Like each system has its custom menus (see manufacturer), I consider that you already know how to do it. Just in case, here are two official links:
Initialization of the unit
If it’s been a while since you last used it, or if you can’t remember its settings, it may be useful to reset your box. For that, it’s easy, you have to plug it in then press the small reset button for 5 seconds (until the LED flashes).

The box will then restart with its factory settings and you can connect to it with the default settings.
You could then connect to wifi; the SSID and its password are printed on the label. The thing is, since you are going to change the network settings next, you may lose your connection. The safest way is to connect to it in RJ45 on the LAN port.
The configuration is done via web interface, here are the default parameters:
- Address: the doc tells you to connect to
http://tplinkwif.netbut you can also use its IP address,192.168.0.254. - Username:
adminas username, as well as password.
Then click on the Quick Setup button (top right) to start the setup.

WISP configuration
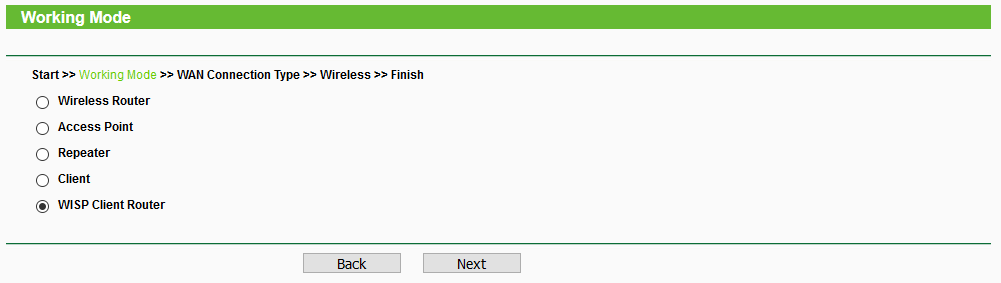
As the first screen is only a welcome, click on Next, you will now be able to choose the operating mode of the box.
We could use the client mode. In this case, the box will extend the wifi network to the equipment connected to it (they will all believe to be connected to the smartphone network). I do not know why, but this mode did not work well with our pfsense a few years ago…
In WISP mode on the other hand, the box will act as a router (and even do NAT). The smartphone will only see the box and your equipment will be “hidden behind”. I prefer this mode because the networks are a little better delimited (personal preference).
Unsurprisingly, choose WISP Client Router. And click on Next.
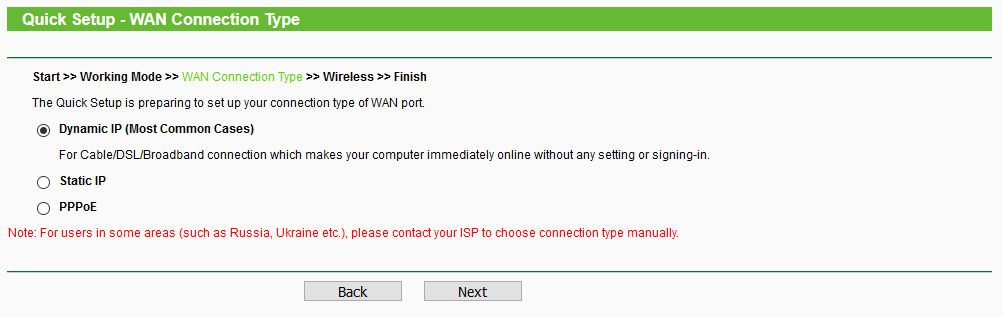
The next screen asks you how to configure the IP parameters of this internet connection. Unless you have a smartphone with a really special configuration, leave Dynamic IP (first choice, by default) and click on Next.
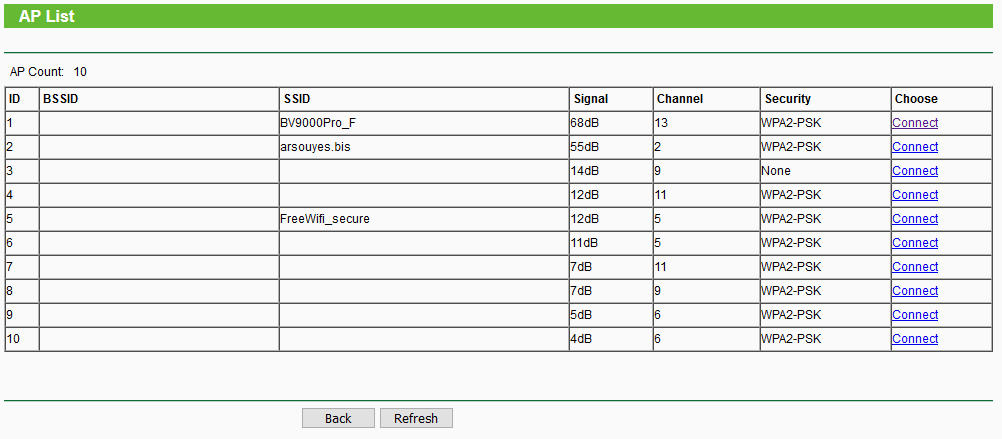
The next screen now asks you to configure your phone’s wifi connection. We could of course enter the parameters by hand, but because I am an eternal lazy person (and to avoid manual entry errors), we will use network discovery.
Click on the Survey button.
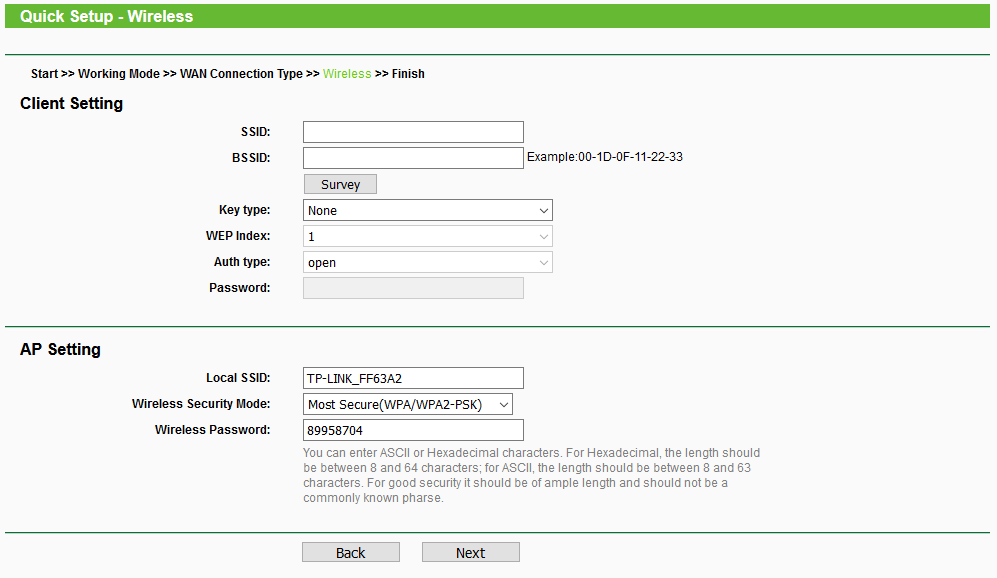
The next screen will then display the WiFi networks that the box has heard, locate yours and click on the connect link on its line.
For the record… Yes, we have a neighbour who has a connection without any protection…
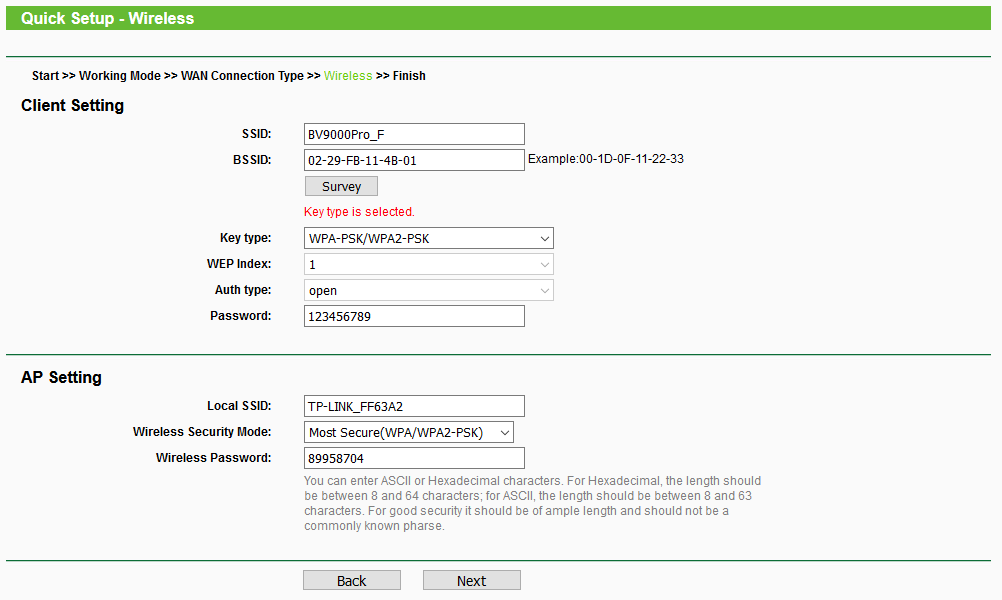
Back to the network configuration screen, all you have to do is configure the connection password (123456789 in the capture but yours must be configured on your smartphone).
This screen also allows you to configure a wifi access point (AP Setting) so that your wifi equipment can connect to your box rather than your smartphone.
It is normal, the use case of WISP is when you share a Wifi connection of a hotel (campsite, restaurant, train station,…) and want to avoid paying for each device that you connect.
Then click on Next.
Configuration with pfsense
At this point, your box acts as a router and will provide an internet connection to the devices that will be connected to it. Technically, we could directly mix the LAN port of the box on our LAN so that the PCs have internet access.
But for us, it will conflict with the services we host:
- The AD and the domain that goes with it, needs static IPs and to be the clients’ DNS server (the tplink would then have to accept that its DNS be overwritten, but it has no screen for that).
- VOIP and our ipbx, which also uses a domain name (and its fixed ip that goes with it), as well as our ecosystem of applications (gitlab, reverse proxy, matomo, …)
- And since our pfsense are blocking advertising, it would be a shame to do without.
We are therefore going to branch this LAN socket towards the “emergency connection” tab of our pfsenses. Physically, we have two RJ45 ports on our switch in their dedicated VLAN. The advantage is that our infrastructure will not see the difference.
If you only have one pfsense and if it’s configured for DHCP on that network interface, you don’t have to do anything at all.
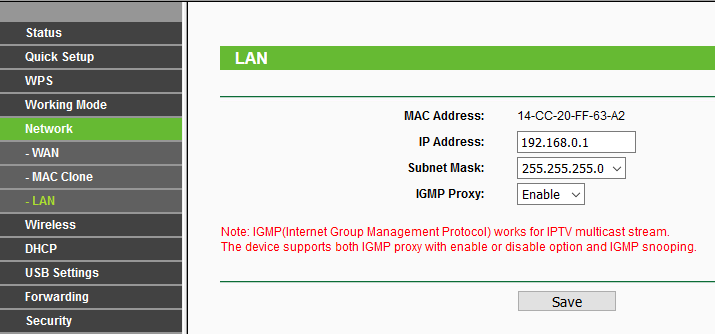
As we have put two pfSense in high availability and with a Static IP configuration, we must ensure that the IP parameters of the box and the pfsense are compatible …
- TPLink, by default, uses the network address
192.168.0.254with a DHCP (from 100 to 199). - pfSense, with us, use the addresses
192.168.0.251and192.168.0.252but for high availability, they use the virtual IP address192.168.0.254. Firewalls want a router at192.168.0.1.
Rather than re-configure the common IP of our pfSense, we will simply
configure the IP of the TPLink box. For that, we go to the Network /
LAN menu and we change the IP (to 192.168.0.1 for our
case).
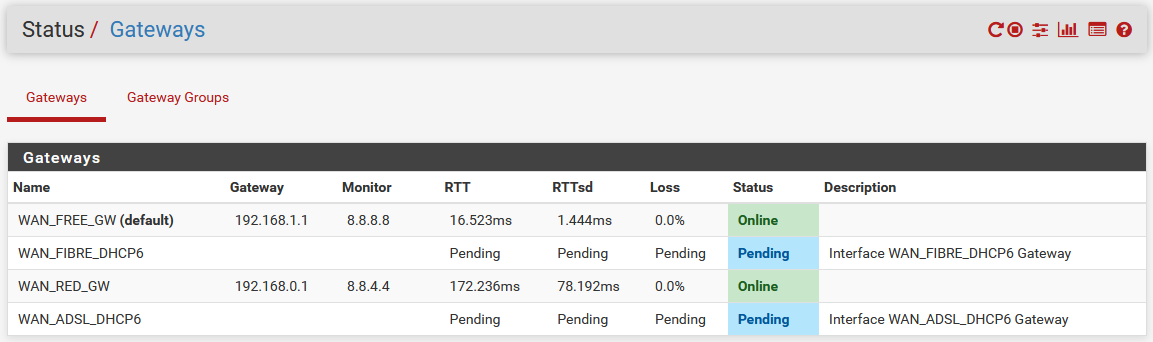
And there, magic of the network, it falls in motion. Gateway monitoring sees that the back-up connection is available and functional …
And after ?
I grant you, leaving a smartphone sharing the Wifi connection permanently is not the most practical thing. So, we now have a hybrid approach…
Normally, we are in Disaster Recovery mode. The phones do not share anything and our mini-router is stored in its box. It is only if there is a network problem that we will activate the shares and plug in the box (intervention time <5 minutes).
In a critical period, we are in Business Continuity mode. During a video conference or other activity that cannot lose the internet, we plug in the mini-router and we share the connection. The switch will be done automatically.