Continuous deployment and dynamic web directory
Spoiler: When building web applications, we generally like to be able to easily deploy variants for testing (and possibly merging them afterwards). And there is the problem of their hosting and their web addresses… Here we will use a DNS server to point all subdomains to the same machine, a specific TLS certificate to handle those names, a VirtualDocumentRoot in apache to route request to corresponding directories and setup Gitlab CI to deploy the files according to branch names.
Whether it is for the arsouyes site or for freedomnia, we have set up a pre-production server. When adding a feature or writing an article, we prefer to deploy it there first before pushing it into production (this avoids a few hiccups).
For slightly longer cases, the ideal is to go through a dedicated branch. As long as they are not completed, the functionality or writing is prepared in its own side, without interfering with the master branch on which we can still make changes that we can check in pre-production and then push into production.
I admit that manually deploying a few static environments is feasible (e.g. “production” for the final version, “staging” for pre-production and possibly “testing” for tests). But it quickly becomes painful if you want to do it for each small branch that you create.
And yet, it would be so handy to be able to visualize each of them…

Fortunately, if your application only needs to copy its contents to a web server directory, you will be able to automate the creation of these environments. Otherwise, with luck, you will be able to adapt the method that we are going to show you here.
Prepare the terrain
As you can imagine, for a web application to work, it is not enough to configure a web server, it is also necessary that the DNS associates its name with its IP address and that TLS certificates are available to secure the flows.
DNS setup
Once the machines are installed and connected to the network, I always prefer to start with the DNS configuration. As we will be using host names for connections to the web server, this will avoid having to enter them by hand in the HTTP headers. It is possible, but it is much more convenient to let the browser use the URL directly.
We will therefore choose a domain (i.e.
grav.arsouyes.org) and configure our DNS server so that it,
as well as all its subdomains, point to the same IP address (that of the
web server).
** With pfSense. ** Go to the “Services / DNS Resolver” menu then add a specific configuration in the “Custom options” text field:
server:
local-zone: "grav.arsouyes.org" redirect
local-data: "grav.arsouyes.org 86400 IN A 192.168.0.124"
These lines tell the DNS server that the domain
grav.arsouyes.org, as well as all its subdomains, must
point to the address192.168.0.124 (this information having
a lifetime of 86400 seconds, i.e. one day).

- With unbound. As it is the DNS server embedded by pfSense, you can use the same method.
- With bind. If you are using a
bind9DNS server instead, you can insert a line like this in your zone file:
*.grav.arsouyes.org IN A 192.168.0.124- *Under windows.** If you have a DNS server under windows
(i.g. integrated into your AD), you can also add a “DNS
wildcard”, for that, add an entry as you would usually do (A or CNAME)
but fill in
*.grav(or only*depending on your case) as the name.

After a possible purge of your clients’ DNS caches, from here any
network connection to a subdomain (e.g.
test.grav.arsouyes.org) should go to your web server.
TLS certificate
Personal preference, I then take care of the certificates so that I can directly configure my web server in HTTPS. Technically, we could test without TLS first and only get started afterwards (so you could skip to the next section).
The certificate that we will generate is a little different from the others because we will not be able to write there, in advance, all the subdomains for which it will be used since we want to be able to choose our names afterwards. Fortunately, the X509 format (that of certificates) already has what it takes to add a generic alternative name.
For the rest, I will only show you the subtlety compared to the usual. If you don’t know how to generate certificates, you can read this article with the usual steps.
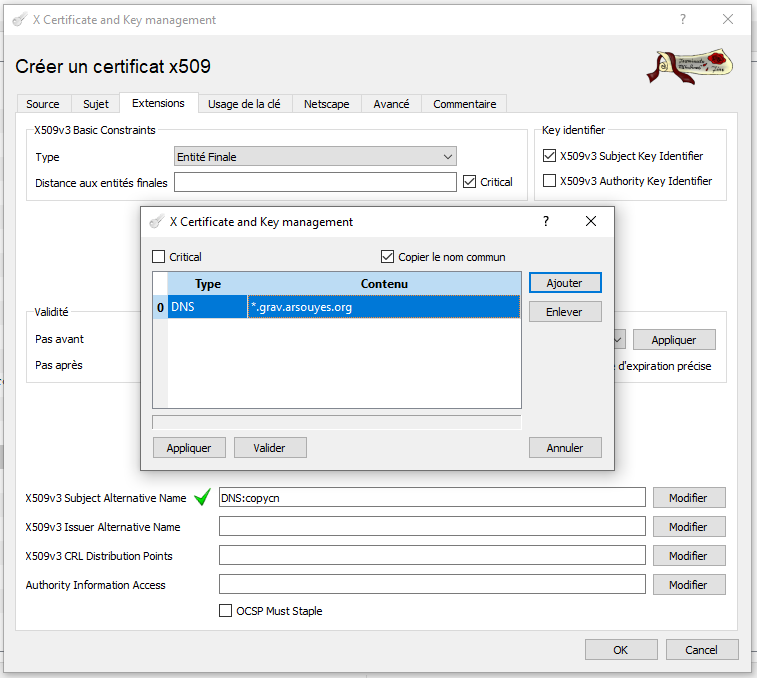
If you are using XCA, in the “Extension” tab, modify the “X509v3
Subject Alternative Name” (click on the modify button to its right) and
add the generic DNS entry (*.grav.arsouyes.org, to be
adapted at home).
You can then complete the other settings as usual and finally export the files:
- The certificate, which will be called
grav.arsouyes.org.crtin the following (but you can give it another name), - The key, which we will name
grav.arsouyes.org.keyin the following (same, be creative).
Web configuration
As I said, we would like each domain name in a query to correspond to
a different directory in the system. That’s good, apache2 has a
directive made just for that, VirtualDocumentRoot that we
are going to use.
This is also possible with other web servers, like nginx but since we don’t have any on hand, we couldn’t test the information on the web. And then I find that apache has a little old school side that I like (and no, I’m not fusty).

The base, in http
To do this, you must first activate the mod_vhost_alias
module (it is the one that provides this directive). Under ubuntu and
cie., this line does everything necessary:
sudo a2enmod vhost_aliasThe command tells you that you must now reload apache2 to take the change into account but as we will anyway add a vhost afterwards and that we will also have to reload it at this time, we can postpone this operation.
We then create the vhost configuration file, under ubuntu in
/etc/apache2/site-available/grav.arsouyes.org.conf with the
following content:
- ServerName: configures the “main” domain name of this vhost,
- ServerAlias: Configures “alternate” names that can also be used. By putting an asterisk in them, we tell apache that subdomains are also managed by this vhost.
- VirtualDocumentRoot: configures the root directory
of the vhost, but allows variables, here,
%0will be replaced by the fully qualified domain name used in the request. For details, you can read the official documentation, it is rather well written. - The other directives could not be more classic (I have intentionally omitted what is not essential, it’s up to you to add your specifics).
<VirtualHost *:80>
    ServerAdmin hello@arsouyes.org
    ServerName    grav.arsouyes.org
    ServerAlias *.grav.arsouyes.org

    VirtualDocumentRoot /var/www/%0

    <Directory /var/www/>
        Require all granted
    </Directory>
</VirtualHost>
It is therefore necessary that each domain name that one account used has a corresponding directory. If we wanted to create the three environments we were talking about in the intro, we would do something like this:
sudo mkdir /var/www/production.grav.arsouyes.org
sudo mkdir /var/www/staging.grav.arsouyes.org
sudo mkdir /var/www/testing.grav.arsouyes.org
However, creating these directories will not be necessary if, as shown at the end, you go through continuous integration to automatically deploy your branches in these directories.
We can then activate the vhost and reload the apache configuration with these two commands:
sudo a2ensite grav.arsouyes.org.conf
sudo systemctl reload apache2
If a visitor enters a subdomain for which the directory does not exist, apache will return a generic 404 error, so avoid making this kind of configuration accessible from the wide Internet.
Security, in HTTPS
Once you have your particular certificates (with the generic domain name) and your HTTP vhost is working, technically the HTTPS configuration is the same as usual.
We start by deploying the two previous files on the web server:
- The certificate, should be placed in the
/etc/ssl/certsdirectory, - The key, should be placed in the
/etc/ssl/privatedirectory.
The use of these two directories is not mandatory but has the advantage of following habits. They are therefore already configured with the correct access rights, and another admin who comes after you will find your little ones more easily.
If it is not already the case, it is necessary to activate the
mod_ssl module (which, although its name indicates it
badly, does TLS well).
sudo a2enmod sslFor the configuration of the vhost, to keep things simple, we will
add this content to the previous configuration file (it will therefore
have two VirtualHost directives). This is the same as in
HTTP to which we have added the classic SSL/TLS directives.
<VirtualHost *:443>
    ServerAdmin   hello@arsouyes.org
    ServerName    grav.arsouyes.org
    ServerAlias *.grav.arsouyes.org

    VirtualDocumentRoot /var/www/%0

    SSLEngine on
    SSLCertificateFile    /etc/ssl/certs/grav.arsouyes.org.crt
    SSLCertificateKeyFile /etc/ssl/private/grav.arsouyes.org.pem

    <Directory /var/www/>
        Require all granted
    </Directory>

</VirtualHost>
If you prefer to have only one vhost per file, you can put the previous content in a second file (i.e.
grav.arsouyes.org-ssl.conf, in/etc/apache2/site-available) but don’t forget that it will also have to be activated with asudo a2ensite grav.arsouyes.org-ssl.
All that remains is to reload the apache configuration to take these changes into account:
sudo systemctl reload apache2Et voilà, your environments are not only available, but also
accessible in https.
Continuous deployment
Technically, we could stop here, just create a directory (with a name
ending in .grav.arsouyes.org) and put some content there so
that it is accessible via a browser. But since I told you about branches
in the introduction, you might as well follow the idea…
For these operations, I will base myself on GitLab and above all, its runners and its continuous integration.
The runner
As the goal is to do something simple, let’s install a runner directly on the machine that serves as the web server.
If your applications are finicky about file permissions, it may be necessary to change the user identity used by the runner.
For freedomnia, we use to use a static CMS, jekyll, which use to build the static site. Once deployed, apache only needs read access and since the runner creates the directories in
775and the files in664, this is more than enough and we didn’t have to do anything to this server. !! On the other hand, for the arsouyes site, we use grav which needs certain directories to be “its” property (in fact, that ofwww-data) for its cache and other peculiarities. Rather than giving the runner sudo rights to change the owner of the files it creates, we can also make it work directly aswww-data.
If you want the runner to use another identity, you have to uninstall
the service and then reinstall it with new parameters, for that, you can
adapt the following two commands (here, we configure with the user
www-data):
gitlab-runner uninstall
gitlab-runner install --working-directory /var/www --user www-data
From here you can register your runner as usual but set its execution mode (its executor) to “shell”. It will be more convenient to copy files and run commands on the server.
The “ssh” mode is not really suitable for our situation. On the one hand because it will impose to store identifiers so that it can connect to the web server (which is not great) and because it is vulnerable to an MITM (because it does not check the server key). ! Likewise, some other modes are specifically designed for automatic deployment (i.e. kubernetes) but then our previous steps were unnecessary since you already have a more complex platform.
Continuous integration
Now that we have an agent to run our commands, all we have to do is
write them to gitlab’s continuous integration configuration file (the
infamous .gitlab-ci.yml).
To determine the name of the branch, it is best to use the variable
CI_COMMIT_REF_SLUG because not only is it defined during
merge requests (which is not the case withCI_COMMIT_BRANCH)
but in addition, it is adapted to function as a DNS name (unlike
CI_COMMIT_REF_NAME, non-alphanumeric ones are replaced
by-).
Since I prefer to simplify scripting, I start by setting a few handy variables:
VHOST_DIRECTORY: which I will use in my orders, it will make them shorter,GIT_STRATEGY: which I set tononebecause I don’t need the runner to get the code in its working directory,GIT: which allows me to store the path to the command and avoid retyping it each time afterwards.
variables:
    VHOST_DIRECTORY : /var/www/${CI_COMMIT_REF_SLUG}.grav.arsouyes.org
    GIT_STRATEGY: none
    GIT: /usr/bin/git
We can then define a task to deploy our environments for each branch:
- The
onlydirective allows you to restrict these tasks to branches, - The
environmentdirective lets us tell gitlab that we define a particular environment by providing it with a name (namedirective), an address (url) and, we’ll come back to that, an action on deletion (on_stop), - Finally, the
scriptdirective defines the commands to run to deploy (in our case, agit clonethe first time and thengit fetchto update to the correct version).
If your application is deployed differently, you can adapt this task to your constraints, the only two important points here are a) use
CI_COMMIT_REF_SLUGfor the domain name and directory and b) theenvironmentdirective to declare your environment.
deployement:
    stage: deploy
    only:
        - branches
    environment:
        name: $CI_COMMIT_REF_NAME
        url: https://${CI_COMMIT_REF_SLUG}.grav.arsouyes.org
        on_stop: destroy
    script:
        - >
            if [ ! -d $VHOST_DIRECTORY ] ; then
                $GIT clone                       \
                    --branch $CI_COMMIT_REF_NAME \
                    $REPOSITORY_SSH              \
                    $VHOST_DIRECTORY ;
            fi
        - cd $VHOST_DIRECTORY && $GIT fetch $CI_COMMIT_SHA
With this task, as soon as continuous integration is launched on a
commit (for a branch or a merge request), we will update the
corresponding directory to contain the application in this specific
version. For its part, the environment directive allows
GitLab to take into account that an application exists for this branch
and that it can display it to us in various places of the interface.
Finally, we will define the destroy task whose name we
provided in the previous task (for theon_stop
directive).
This is a special task whose purpose is to delete the deployed environment and which will be automatically invoked by GitLab when the environment is deleted. Whether it’s because we clicked the stop button in the interface, or because the branch was deleted.
- stage and only: must take the same value as the task that creates the environment (otherwise, it may no longer work),
- environment: must have the same name, not have a
url (because it is no longer supposed to be valid once the environment
is deleted) and the
actiondirective which is worthstop. - script: a simple
rmwill do for us, but we can imagine more complex depending on the case, - when: must absolutely contain
manual(in addition to other details you would have in the task that creates the environment).
destroy:
    stage: deploy
    only:
        - branches
    environment:
        name: $CI_COMMIT_REF_NAME
        action: stop
    script:
        - rm -rf $VHOST_DIRECTORY
    when: manual
It’s not really documented but
when: manualis necessary because without it, the runner (via the CI) will systematically execute it for each commit, and therefore delete the environment each time too…
With this second task, GitLab knows how to delete the environment and will do it automatically when it is no longer needed: if a subsequent task fails or if the branch is deleted.
And next
Even if this article is quite long, in retrospect, the steps are actually quite simple to see classic:
- A DNS configuration line (good, three in the case of pfSense),
- A TLS configuration line (SAN extension for a generic domain),
- An apache configuration line (the VirtualDocumentRoot, two if you have both http and https),
- A specific runner and deployment scripts in the CI (which can be reused from one project to another).
And then, we can now abuse branches and therefore adopt an organization of type “git flow” (and its variants where the development of a feature must go through specific branches, the famous “feature branch”).
It might seem like overkill for a static site or a classic CMS, but it’s actually very handy for testing all our ideas. So we can go in any direction, see what happens as we go (without touching anything on the main branch). If that’s a good idea, we merge and you take advantage of it, otherwise, we remove the branch and you won’t see a thing.