Create a video contact sheet with Linux
Spoiler: Very useful in forensics reports (but not only), the video contact sheet allows you to show excerpts from a video in a single image. Here's how we go about generating them. We will use ffprobe, ffmpeg, convert and montage (from imagemagick). The first to get the video parameters, the second to extract the images you want to keep (in png), the third to reduce the size of the images and the last to build the sheet containing the thumbnails.
In a forensic examination where there are videos, it is very useful to display boards with thumbnails of them. At a glance, the judge can preview the content without having to watch the entire video.
Derived from photography and video tape, the term "contact sheet» refers to the printing of all the views of a film on one sheet from its negative.
English speakers have adapted the idea to digital with the term "Video Contact Sheet" which defines the preview of a digital video at the rate of a defined number of images of the video on the same sheet. Where a contact sheet contains all the images, the video contact sheet contains only a subset.
In French, we could translate this variant by "Contact Video Board", but it seems very little used and we therefore generalize the contact board to previews containing only certain images. And that's what we're going to talk about today.
Tool installation
Unsurprisingly, we need the following commands:
ffprobeto determine the duration of the video,ffmpegto take the captures,convertto reduce the size of the captures,assemblyto make the contact sheet.
Since ffprobe is included in theffmpeg package and montage andconvert in the imagemagick package, we just need to install these two packages.
sudo apt-get install ffmpeg imagemagickTourism. Do not confuse montage andmontage:
montage, theimagemagicktool, which is used to create an image made up of other images,montage, the ubuntu package developed by Caltech to stitch spatial images.
Sampling frequency
Ideally, you would like to be able to tell a tool "take X images distributed evenly". But it won't work directly with ffmpeg which wants a sample rate (number of frames per second).
In the following, we will use the video Cosmos Laundromat, the fifth free short film from the Blender foundation under the Creative Commons Attribution 4.0 license.
Video duration
We start by calculating the duration of the video. This can be done using ffprobe, with the following options:
- -show_entries format=duration : among the information to show, we only want the duration,
- -v quiet : disables information messages,
- -of csv="p=0" : indicates that we want CSV-like output. p = 0 indicates that we only want the value,
- -i : to specify the file to play.
ffprobe \
    -show_entries format=duration \
    -v quiet                      \
    -of csv="p=0"                 \
    -i cosmos-laundromat.mp4
Sampling frequency
With the duration of the video, we are tempted to calculate the time between each capture (the period), but ffmpeg wants the reverse (the frequency).
As the duration from ffprobe contains milliseconds and the frequency is likely to be less than one frame per second butbash cannot do a comma calculation (c=$(($length/$nb)) only supports integers), we will use bc.
If $length is the length of the video provided by the previous command, and$nb the number of frames, the sample rate can be calculated in bash with the following line:
echo "(($nb/$length))" | bc -lThe captures
Sample
To extract the images, we will ask ffmpeg to convert the movie to thepng format. Since this is an image format (not a video), ffmpeg will create as many files as there are images in the video. For that, we use the -vcodec png option and give it the pattern to construct the names of thecapture-%03d.png files (%03d will be replaced by a three-digit number that increments at each frame).
And since we only want certain frames, we'll tell it the frame rate per second to use when converting. We therefore add the option -vf fps = $freq (where$freq is the frequency, result of the previous calculation).
ffmpeg \
    -i cosmos-laundromat.mp4 \
    -vf fps=$freq            \
    -vcodec png              \
    capture-%03d.png
While we're at it, we'll take the opportunity to add the capture timestamp at the bottom of each image. We will therefore add a drawtext filter to apply before sampling to add text at the bottom of the images.
ffmpeg apply its filters one after the other, in the order you provide them. If you put this filter after the frequency, the timestamp will be calculated after sampling and you will not get the timestamps you expected.
ffmpeg \
    -i cosmos-laundromat.mp4 \
    -vf drawtext="text='timestamp: %{pts \: hms}':x=(w-text_w)/2:y=h-th-10:box=1:fontcolor=black:boxcolor=white@0.5:fontsize=(h/5)",fps=$freq \
    -vcodec png \
    capture-%03d.png
Resize
We could build a contact sheet by juxtaposing the images extracted directly but the result will be unnecessarily too large . No screen will be able to display so many pixels at once, especially once the contact sheet is included in an A4 report page (and let's not even talk about printing). Rather than wasting MB unnecessarily, we will resize1 the images.
for i in capture*.png
do
    convert $i -resize 160x120 resized-$i
done
Create the contact sheet
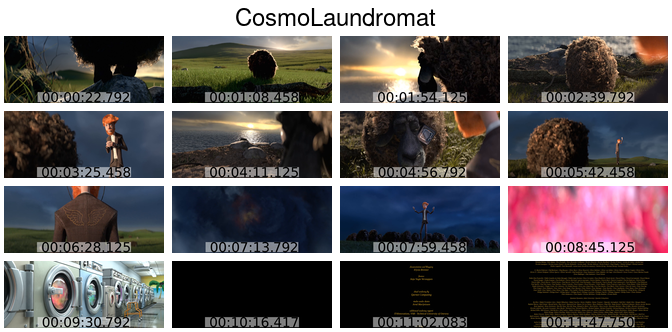
Finally, in order to create the contact sheet and put everything in a single image, we use the montage command. We will use it with the following options:
- -title "Title" : allows you to define the title of the image, which will be displayed at the top. Recognizes special characters
\ nand others\ t. - -tile wxh : your image will contain
wwide thumbnails onhhigh, - -geometry +w+h : each thumbnail will be separated from the others by
wpixels on the width andhpixels on the height
You will also have to give it as input the files from which it must generate the spread and the name of the output file.
montage \
    -title "CosmoLaundromat" \
    -tile 4x4 \
    -geometry +4+4 \
    resized-capture-0*.png \
    output.png
If we hadn't resized the images, they would be very large and the size of the montage title being fixed, it would appear very small.
And after ?
You can now generate contact sheets easily, without installing software other than ffmpeg andimagemagick.
To make our life easier, we have made it into a script, which we use for our expertise.
It takes the video file as its only input parameter. It creates a 4 by 4 spread, whose title is the name of the video file and the file name is the same as that of the video (except for the extension).
It is possible to use the subtleties of ffmpeg in order to modify the script to your liking. You can of course change the colors of the writing, or even select the video range to use (and not the entire movie). But for that, you will then have to redo the calculations.