Create a video contact sheet with Windows
Spoiler: Because it's not just Linux in life, and sometimes the tools are cross-platform, this is how you go about generating contact sheets if you're on Windows. We will find the ffprobe, ffmpeg, convert and montage tools (from imagemagick), but instead of scripting in bash, we will have to go through powershell.
A few days ago, we explained to you how to generate a contact sheet of a video using Linux.
The good thing is that the tools we used are also available for Windows. So it's possible to use exactly the same technique, adapting the scripts a bit to use PowerShell instead of Bash.
Installation
We will use the following tools:
ffprobeto determine the duration of the video,ffmpegto take the captures,convertto reduce the size of the captures,assemblyto make the contact sheet.
ffprobe andffmpeg are part of the ffmpeg toolset, a compiled version for Windows can be found on the Codex FFmpeg website. This is a simple archive, in which there is a bin/ directory containing the executables.
You can find a ffmpeg installation tutorial on this link
convert andmontage are part of the imagemagick toolset, which can be installed via an installer available on the imagemagick website.
When installing imagemagick, you will be asked if you want to installffmpeg. You can, but it won't install ffprobe, so you still have to download theffmpeg binaries.
The path to the executables of imagemagick can be found in thePATH of Windows and can be started from the command line. This is not the case with the executables of ffmpeg.
To use them, you then have the choice:
- Whenever you use these executables, you must enter the absolute path for Windows to be able to find them,
- Add the path to the executables in the
PATH, for this you will need to modify the Windows environment variables and add the path to the directory containing theffmpegbinaries. Changing the Windows environment variables is not the subject of this article, if you want to do it, there is a Wikihow page which explains how to do it, - cheat a bit and copy the executables to the
imagemagickdirectory:C:\Program Files\ImageMagick-<version number>
I personally opted for the third solution. After installing imagemagick and letting it install
ffmpegfor me, I simply copiedffprobe.exeto theC:\Program Files\ImageMagick-7.0.11-Q16-HDRIdirectory.
Sampling frequency
As we explained in our previous article, it is not possible to directly tell ffmpeg to take a set number of captures of a video. On the other hand, it is possible to modify its sampling frequency, ie the number of frames per second of the video.
We will therefore manage to resample the video so that it only has the desired number of frames. From there, making the right number of captures will be easy.
In the following, we will use the video Cosmos Laundromat, the fifth free short film from the Blender foundation under the Creative Commons Attribution 4.0 license.
Video length
In order to calculate the sample rate, we need to know the duration of the video. We will retrieve it from the command line, thanks to PowerShell.
It is possible to do this using the command prompt, but later on, we'll be using PowerShell to do some calculations, so we might as well use that right now.
We will use ffprobe, with the following options:
- - show_entries format = duration: among the information to show, we only want the duration,
- - v quiet: disables information messages,
- - of csv = "p = 0": indicates that we want a CSV type output. p = 0 indicates that we only want the value,
- - i: to specify the file to play.
ffprobe `
    -show_entries format=duration `
    -v quiet                      `
    -of csv="p=0"                 `
    -i cosmos-laundromat.mp4
In PowerShell, using ` allows you to split a command on several lines
Sampling frequency
Now we need the sample rate, which we'll calculate by dividing the number of frames we want by the length of the video.
This is where we need PowerShell. Windows Command Prompt doesn't handle splits with floating point numbers, PowerShell does.
If $length is the duration of the video provided by the previous command, and$nb the number of frames, the sample rate is calculated in PowerShell with the following command line:
$freq=$nb/$lengthThe integer part and the decimal part will then be separated by a comma, something that is not understood by ffmpeg, which expects a period. It must therefore be remedied before it can be used.
$freq=$freq -split ',' -join '.'The screnshots
Sample
We will now ask ffmpeg to convert the video topng. Since this is an image format, ffmpeg will convert the video to as many frames as there are frames. This is why we change the sampling frequency to match the number of frame in the video to the number of frames we want on our contact sheet. We will also take the opportunity to add a timestamp on the video.
For this, we use the following options:
-vcodec pngfor conversion inpng,-vfto apply filtersdrawtext="text='timestamp: %{pts \: hms}':x=(w-text_w)/2:y=h-th-10:box=1:fontcolor=black:boxcolor=white@0.5:fontsize=(h/5)"to add a timestamp to the video, with some options for tuner position, color and size,fps=$freqfor the modification of the sampling frequency, where$freqis the result of our previous calculation,
As well as the pattern for constructing the names of the capture-%03d.png files (%03d will be replaced by a three-digit number which is incremented with each frame).
ffmpeg applies its filters one after the other, in the order you provide them. If you put this filter after the frequency, the timestamp will be calculated after sampling and you won't get the timestamps you expected.
ffmpeg `
    -i cosmos-laundromat.mp4 `
    -vf drawtext="text='timestamp: %{pts \: hms}':x=(w-text_w)/2:y=h-th-10:box=1:fontcolor=black:boxcolor=white@0.5:fontsize=(h/5)",fps=$freq `
    -vcodec png `
    capture-%03d.png
Resize
In order not to have unnecessarily large images in the contact sheet, we will resize them. Here we have chosen a 160x120 resolution. imagemagick will manage to keep the ratio.
 foreach($file in Get-ChildItem ./ -Filter capture*.png)
{
    magick convert $file -resize 160x120 resized-$file
}
In Windows, all imagemagick tools are launched with the magick <tool> command. So, convert is run viamagick convert. This may be to avoid confusion with the Windows convert command, used for converting filesystems.
Create the contact sheet
Finally, using montage, it is possible to combine the images into a single sheet. We will use it with the following options:
- -title "Titre" :allows you to set the image title, which will be displayed at the top. Recognizes special characters
\nand others\t. - -tile wxh :your image will contain
wwide thumbnails byhhigh, - -geometry +w+h : each thumbnail will be separated from the others by
wpixels on the width andhpixels on the height
As well as the files from which it must generate the sheet and the name of the output file.
magick montage `
    -title "CosmoLaundromat" `
    -tile 3x3 `
    -geometry +4+4 `
    resized-capture-0*.png `
    output.png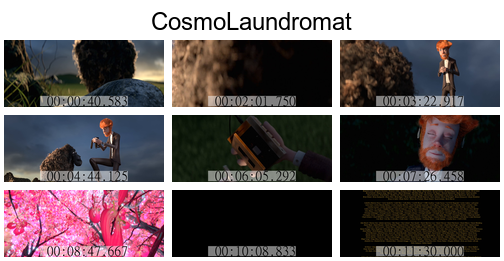
And after ?
When the tools are available on Windows and Linux, that's nice. Some script adaptations are necessary, but the method remains the same.
Unlike Linux where anyone can run a bash script, in the Windows world you will not be able to run a script from a file if you are not an administrator or if the administrator has not given you the adequate rights. On the other hand, it is possible to launch each command line one by one.
So, if you prefer not to modify any of the Windows security options, you will need to copy paste a command line summarizing all the series of commands used to make the contact sheet.
The command line below will allow you to obtain a 4x4 contact sheet including output.png. You will just have to change the name of the source video (here cosmos-laundromat.mp4).
$fichier="cosmos-laundromat.mp4" ; $length=ffprobe -i $fichier -show_entries format=duration -v quiet -of csv="p=0" ; $freq=16/$length ; ffmpeg -i $fichier -vf drawtext="text='timestamp: %{pts \: hms}':x=(w-text_w)/2:y=h-th-10:box=1:fontcolor=black:boxcolor=white@0.5:fontsize=(h/5)",fps=$freq -vcodec png capture-%03d.png ; foreach($file in Get-ChildItem ./ -Filter capture*.png) { magick convert $file -resize 160x120 resized-$file } ; magick montage -title $fichier -tile 4x4 -geometry +4+4 resized-*.png output.png ; rm *capture*