Connect Matomo to LDAP(s)
Spoiler: To see the statistics of visits to a website, while respecting (the privacy of) users, matomo is a very good choice. To take it one step further and restrict data access to certain users, here's how to connect it to your LDAP directory. After having checked that the php ldap module is installed, then deployed the certificate of our CA, we will ask matomo to install its LDAP plugin and then provide it with the network connection parameters and user mapping with our Active Directory. Nothing complicated in fact.
As you probably already know, we use matomo and our access logs to compile anonymous statistics of visits to the arsouyes website. It allows us to see when and which articles are successful, and to move forward.
With logs, it may be less precise and provided than with javascript code, but that is more than enough for us. Small bonus, as the javascript code needs to connect to the server, as we don’t use it, the server no longer needs to be available online.
Our matomo is therefore protected behind our firewall and accessible only to users connected directly to our network.
Although it may be exaggerated in our case, we wanted to go further; by configuring matomo to restrict access to only users registered and authorized by our Active Directory. In effect, it excludes our children and our friends from passing through when we share access to the network with them.
Prepare the server
Technically, you could start directly with installing the plugin and configuring it and then handling errors, but for an article it's more convenient to deal with these sources of errors first.
File access rights
Normally, when you install matomo, you should already have configured the permissions of the files to make it work fine.
This is not always the case and sometimes some directories are not properly configured and Matomo has a problem writing to his cache.

If you encounter this error, you just need to make sure that the system user running the web server has write permission to the cache directory.
If you copied the files to /var/www/matomo, the following command makes sure that it is the user www-data and the group www-data that own the files and directories.
sudo chown -R www-data:www-data /var/www/matomoOnce the ownership is established, the following command adds to the owner (u+) the right to read (r), write (w) contents as well as traverse directories (X).
sudo chmod -R u+rwX /var/www/matomo/tmpPHP LDAP module
Most shared hosting providers activate this module but if you have your own server, it is not installed by default and this will cause problems since the matomo plugin needs it.

Without real surprise, it is therefore necessary to install the php ldap module, which will provide the php scripts with the functions necessary for connections with your LDAP server. On Ubuntu (debian and derivatives), the following command will take care of everything:
sudo apt-get install php-ldapOnce the module is installed, it is necessary to restart the apache2 server (example for ubuntu):
sudo systemctl restart apache2Root certificate of LDAPs
If you've done it right, your LDAP server should require a secure TLS connection (in starttls or LDAPs). For that, you had to generate a particular TLS certificate, which you signed with a root certificate.
Once this root certificate has been exported to a file (let's call it root.arsouyes.org.crt in the following), you must deploy it on your server.
Under Ubuntu, the following commands will copy the certificate to /usr/local/share/ca-certificates then take this new file into account and deploy it correctly in the system:
sudo cp root.arsouyes.org.crt /usr/local/share/ca-certificates
sudo update-ca-certificates
LDAP reader user
Last detail, to read the contents of the directory, matomo will need the credentials of a user who has the right to do so. Rather than providing him with your credentials, prefer create a restricted user.
When a user authenticates to matomo, two LDAP connections will actually be made. The first, with the user's credentials, to verify that they are correct. The second, with the specific matomo account, to synchronize the information in the directory.
This second connection may seem unnecessary (since the first also allows you to read the contents of the directory) but is in fact necessary because matomo has a "Kerberos SSO" operating mode where it is apache2 which is responsible for authenticating but only provide the username. Hence a specific account to read the information.
The identifiers of this specific matomo account are stored in clear text in the config/config.ini.php file and accessible by all plugins. So protect the file and be careful when choosing plugins to install.
Install the plugin
Start by logging into your matomo application with an account with administrative rights (the one created during installation or another that you would have created afterwards).
Go to the administration menu, click on the cog icon (top right). Then in the components market via the left menu, "Platform / Marketplace".
To avoid going through the entire list, you can enter the keyword "ldap" in the search field.
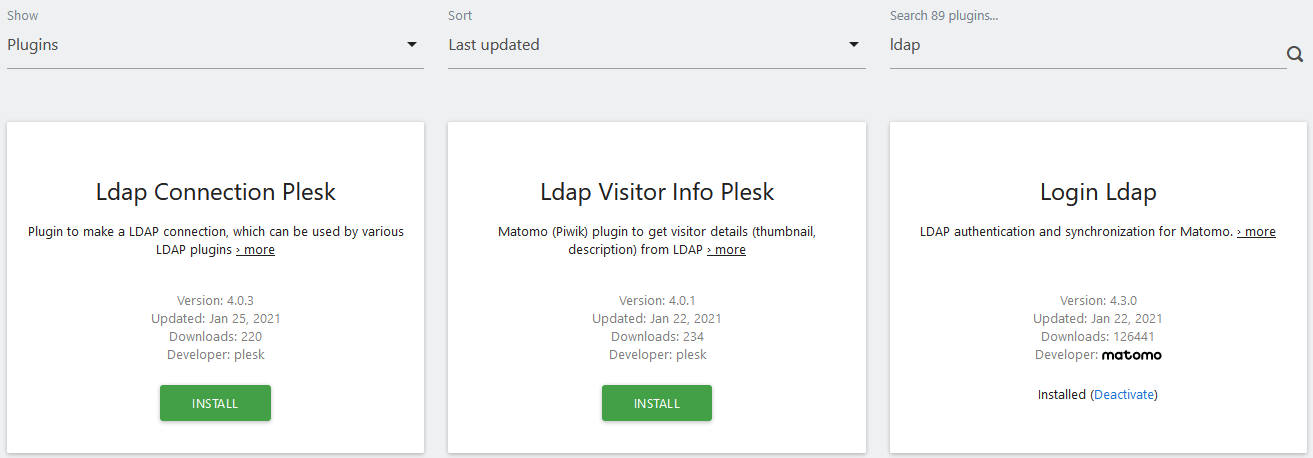
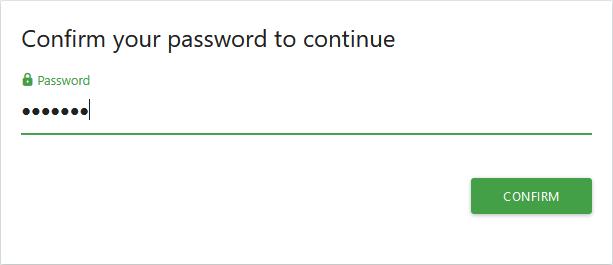
Click on the green "Install" button of the "Login Ldap" plugin. To avoid XSRFs, the interface asks you to enter your password and then click on "Confirm".
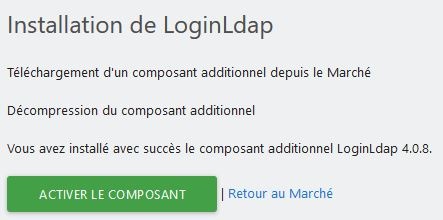
The application then installs the plugin and offers to activate it, click on the green button "Activate the component".
Configure the plugin
The plugin is configured via the administration interface, in the "System / LDAP" menu. There is only one page to configure everything but it is divided into several sections which we will follow step by step.
LDAP settings
The first section concerns the global parameters of the plugin. Normally, you don't have to enter anything here, the defaults should do the trick.
- Always Use LDAP for Authentication: should be checked to avoid storing passwords in matomo. This is best for security and will prevent problems when users change their password.
- LDAP memberOf field: is pretty classic and the default (
memberOf) should work, - Required User Group: if you want to restrict authentication to matomo to members of a particular group.
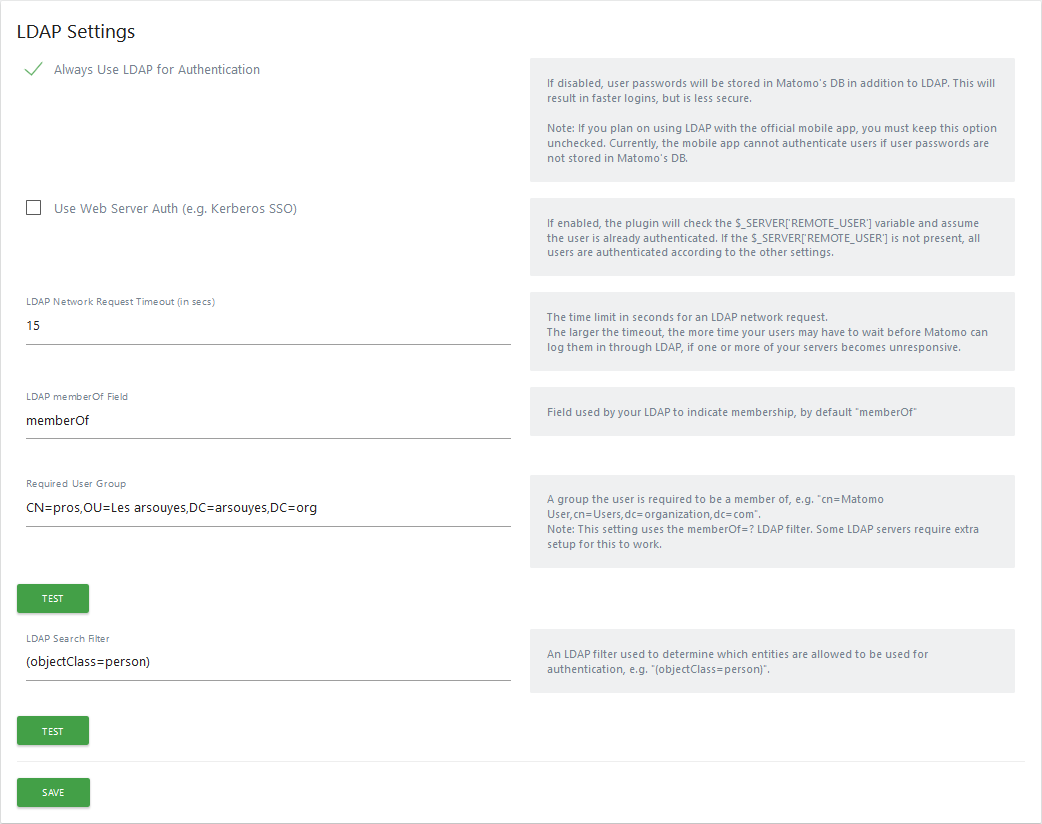
The green "Test" buttons will not work until all the connection parameters to the LDAP server have been made. So no need to click for now, wait until you reach the end of the article.
Then click on the green "Save" button.
User synchronization
As there are several conventions for storing users in an LDAP directory, you have to configure the plugin to tell it how to find the information it needs.
All of the following settings are made for Active Directory. If you have an openldap, the defaults should be sufficient.
- User ID Field:
sAMAccountName, - User Password Field:
userPassword, matomo uses it to generate authentication tokens, it will not store either the clear version or the hashed version of AD. - E-mail Address Field:
userPrincipalName, - E-mail Address Suffix: leave blank,
- Initial Stites With View Access For New Users: we left "all" but you can set the IDs of the sites accessible by default for your users.

Then click on the green "Save" button.
LDAP server
Last phase, configure the LDAP server to which matomo will connect.
- Server Name: leave
server1(otherwise matomo doesn't like it at all, #115), - Server URL: enter the host name of the server, possibly prefix the protocol (
ldaps://), - Server Port: if you did not specify the protocol previously, enter the port number,
636for LDAPS (starttls is not possible with matomo, #184) - Base DN: specify the OU that contains your users,
- LDAP Bind Username: specify the full name (with OU and cie.) of the specific user for matomo,
- LDAP Password: specify the password for this specific user.

If you are playing adding and then removing servers, be aware that they are always present in the configuration file config/config.ini.php (#236). If you've entered valid credentials there, it might be worth going to clean the file by hand.
Then click on the green "Save" button.
And after ?
With these settings, your users can now connect to the matomo application with their active directory credentials (or openldap if you have adapted the settings). The first time they log in, matomo will save them in its own database to store, among other things, the access rights.
As always with LDAP connections, the interest is also to facilitate user management by centralizing everything on AD. Via OUs (that's so-so) or groups (that's better), you can very easily allow or deny access to matomo for a user.