Setup IPv6 High Availability on pfSense
Spoiler: To stay connected to the Internet in case of failures of our firewall, we’ve decided to redundant it. The documentation lacks support of IPv6 so we had to dig a bit to find a working solution (sort of, because some linux distro’s do not handle all of IPv6). We better understand the lack of IPv6 in teaching and deployments.
Like many other Network addicts, we are so anxious of a breakdown somewhere that make us lose our connection that we try to redundant everything that can be redundant. Well, we admit it, it’s also for the geeky beauty of the exploit.
So we started by redundantizing our accesses themselves. In case the fiber brake down, we have ADSL with another provider. And in the event of a problem in the last 100 meters, we can also share our 4G connections, with a third operator. The switch between these connections will be done automatically by the firewall. And to be sure, we do exercises regularly.
But what about the firewall itself… what if it’s the one that brake down?
We had originally hacked with an active/passive mode with ESXi where a firewall was off and waiting for us to start it when needed but we have to admit that it wasn’t very convenient. Each configuration change had to be manually transfered and the failover was not always automatic.
We therefore decided to invest a little more time in implementing the official solution of the myth: high availability (often written abbreviated HA). This time the two firewalls work together: the configuration is automagically synchronized and the secondary will take care of the network traffic as soon as the primary stops responding to it.

For IPv4, it’s almost child’s play; the official documentation provides an example configuration which is enough to follow and even a second page to diagnose and troubleshoot if it doesn’t work the first time…
For IPv6, on the other hand, it’s another story… Apart from a few clumsy mentions, some of which were erroneous, in a netgate hangout in March 2017, nothing is usable as is. Don’t look for a solution in the many tutorials out there either; they only paraphrase the official example, in IPv4.
Is the world stuck in the 80s?
So, as we absolutely wanted to be connected to the Internet of the future, we rolled up our cyber-sleeves and after a lot of elbow grease, found the why of the how and ended up in something that works (almost always at least).
Map and addresses
Before starting, as always when we work with network, we will draw up the map and report on it all the information we will need. We let you replace our example values with yours at home.
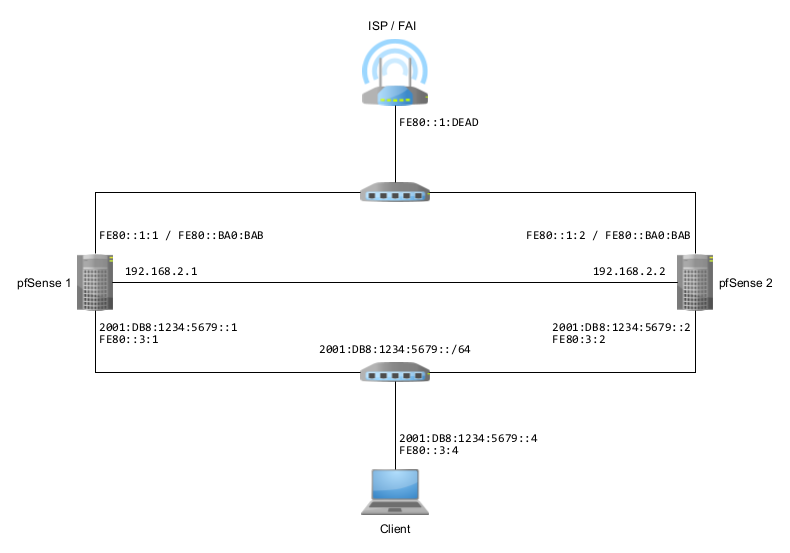
Two firewalls. Obviously since we are talking about high availability… Note that according to the documentation, they must have the same network connections - cards connected in the same order with the same names - and that you have to setup them manually.
Public IPv6 prefixes. We will assume that your
internet service provider has assigned you at least one IPv6 prefix that
you can delegate. 2001:DB8:1234:5679::/64 in our
example.
If your provider only assigns you a single prefix and it’s stuck to the box like a barnacle to boat hull, it’s going to be complicated for you. If you want advice, change provider.
Synchronization - in IPv4
I promise you an IPv6 configuration and you realize that the synchronization network that connects the two firewalls is in IPv4 on my diagram. Was I wrong, or worse, was I lying to you?
Nope ; this is because synchronization cannot fully work in IPv6. If you want to do it anyway, you will run into two problems.
1. The choice of addresses. Your interface must have
a fixed address but you cannot use a link local address (prefix
FE80, the user interface prohibits it). So you have to
either use a public prefix (cf. the March 2017 hangout but I
find that to be wasteful) or use the private FC00
prefix.

2. pfSync refuses IPv6. Then once in the high availability setup screen you can enter your IPv6 addresses but the interface will not accept it for state synchronization (pfsync) and will let you know that it only accepts IPv4.

So, at best, you could synchronize the configuration with IPv6 but will have to keep the synchronization of states in IPv4… It’s a shame and to avoid complicating everything with two addresses, we advise you to keep everything in IPv4 for synchronization.
The official documentation being well done, we will not detail this part and we will continue on the other subtleties.
WAN side - a VIP
Your internet access box is not designed to see two firewalls and send traffic by itself to one or the other. It only wants to see one and especially does not want to know anything about your little arrangements.
You will therefore have to use a VIP (virtual IP address)
that the two firewalls will share (in our example:
FE80::ba0:bab/64).
The setup will be done as in IPv4 and you can therefore follow the official documentation.
The subtlety, this time, comes rather from the setup of the provider’s boxes:
- In IPv4 we had the notion of DMZ address. Since the boxes only had one public IP address, you told them to redirect all incoming traffic to the IP of your firewall (the famous DMZ) and NATed it to hide all the network that was behind.
- In IPv6 the operators assign you several IPv6
/64prefixes and let you say to whom to send the traffic of these IPs (some boxes speak of DMZ, others of delegation and next hop).
Example at free
Once in the setup interface of the box, go to the settings, choose
the advanced mode then click on configuration IPv6. The new
window informs you of the local IPv6 address of the box (starting with
FE80, note this address somewhere because you will have to
enter it as a gateway on your firewalls) and offers you to setup the
prefix delegation.
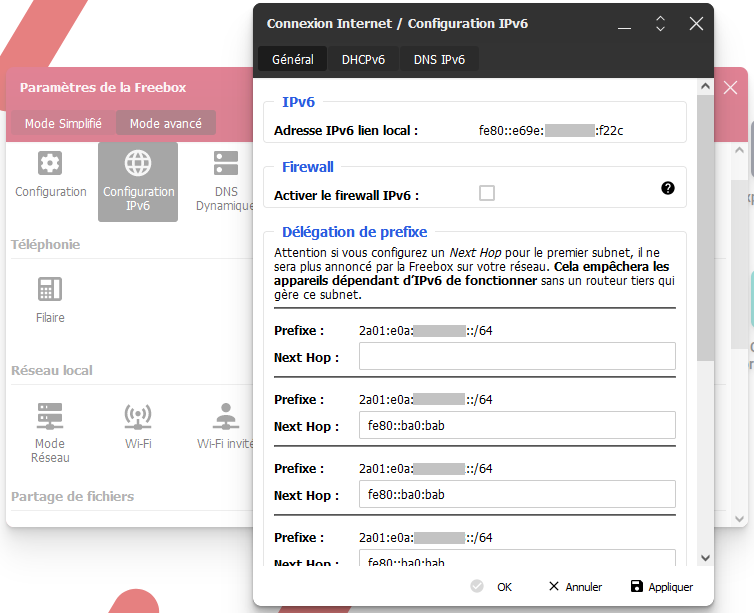
For each of the prefixes that you will use behind your firewalls,
enter the virtual IP address (FE80::ba0:bab in our example,
to be adapted according to your network).
Example at RED/SFR
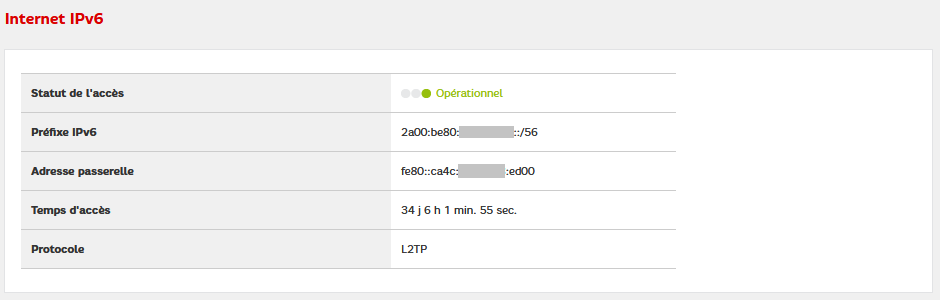
Once connected to the administration interface of your box, go to the
Etat menu then Internet and navigate to the
Internet IPv6 box. You will see there the public prefix that
has been assigned to you and, above all, the IP address of the gateway
(prefix fe80 to note for later because it will be the
gateway for your firewalls).
You can then go the the firewall side of your box (menu Réseau v6 then Pare-feu). Navigate to the DMZ pour l’IPv6 box.
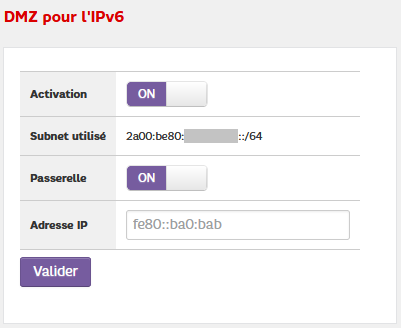
Although the first screen informed us that we had a 56-bit prefix (equivalent to 256 64-bit prefixes), the box only allows us to setup a single 64-bit prefix.
For the rest, the principle is the same as before, enter the virtual IP address of your firewalls as the address of the DMZ so that this prefix is redirected to them.
LAN side - two solutions
It is from here that things get complicated because the documentation is becoming more and more incomplete and we are going to have to confront all these little subtleties of the network that are sometimes incompatible with each other… You will have the choice between the classic solution (which does not always work) and the official solution (which does not always work either).
Use Virtual IP
This solution does not really work, we recommend the next one.
First idea, simulate a single firewall with a virtual IP address. This is what we were already doing in IPv4 and some of the documentation even suggests going through it (i.e. still this March 2017 hangout). In theory it should work…
Setup a VIP. In the Firewall menu, then
Virtual IPs, click on the Add button, choose
CARP, fill in the fields (i.e. address
FE80::3:BA0:BAB/64).
Setup announcements. In the Services menu, then DHCPv6 Server & RA, choose the interface (LAN) then the Router Advertisements tab.
- Router mode: unmanaged will do just fine (read: the others won’t fix the problems),
- RA Interface: choose the previously configured VIP (if this field does not appear, you do not have a VIP on the interface),
- DNS Configuration: you can enter the IP of your
firewalls (i.e.
2001:DB8:1234:5679::1and2001:DB8:1234:5679::2).
Concretely, when a client machine connects to the network and asks where it is, the routers will announce themselves (note that they also do this at regular intervals). On linux, you can see these packets with the following command:
sudo tcpdump -v -n -i enp2s0 icmp6 and ip6[40] == 134And you’ll get lines like this, quite a mess it’s true, but don’t worry; we will explain them to you right after. I changed the IP addresses in my capture to those in the example so you can more easily tell who is who.
10:16:52.293453 IP6 (hlim 255, next-header ICMPv6 (58) payload length: 176) fe80::3:1 > ff02::1: [icmp6 sum ok] ICMP6, router advertisement, length 176
    hop limit 64, Flags [none], pref medium, router lifetime 60s, reachable time 0ms, retrans timer 0ms
      prefix info option (3), length 32 (4): 2001:DB8:1234:5679::/64, Flags [onlink, auto], valid time 86400s, pref. time 14400s
      route info option (24), length 24 (3):  ::/0, pref=medium, lifetime=60s
      rdnss option (25), length 40 (5):  lifetime 60s, addr: 2001:DB8:1234:5679::1 addr: 2001:DB8:1234:5679::2
      dnssl option (31), length 48 (6):  lifetime 60s, domain(s): example.com. example.com.
      mtu option (5), length 8 (1):  1500
      source link-address option (1), length 8 (1): a6:6e:de:ad:be:ef
Basically, this is what these packets say:
- Hi, I (
fe80::3:1) am a router that can forward your packets to the wide internet, - The public IPv6 prefix around here is
2001:DB8:1234:5679::/64, you can pick your address from it, - Here are two DNS servers that will gladly answer your queries, by
the way, the local domain is
example.com, - And last bonus info to make your life easier, here is also my MAC address, so you don’t have to ask for it. You’re welcome.
In theory (from the docs) since you’re using a VIP, only the primary firewall sends these advertisements. The secondary is only supposed to send messages if it detects that the primary is no longer responding. The problem is that both firewalls send these announcements regardless of who has the VIP (may be a regression due to pfSense version 2.6 since the documentation is in 2.4).
Besides, without the latest information on the MAC address, it might even work. To find the physical (MAC) address of the router, the machines would have to request it (via the NDP protocol) and, VIP magic, only the principal would respond.
Unfortunately, as this option is passed on, clients have to take it into account and go crazy for it.
- There are those who will update their neighbor table with each new advertisement received and constantly change their minds about “what is the MAC address of the router” (i.e. Linux and Windows). When it’s the right address, the packets leave and come back, when it’s not the right one, it leaves but won’t come back.
- There are those who, seeing that the address changes, will consider that the network has changed and reconfigure themselves (hello android). They will therefore disconnect while their auto-configuration rebuilds the new network parameters and it can take a little time during which the network does not work.
In both cases you have the impression of an intermittent connection that works randomly.
Prioritize routers
This solution works a little better than the previous one but you will have some surprises under Linux.
Rather than mergin the routers, the solution this time is to clearly differentiate them but by giving them a priority. This time, we are not using a VIP at all (if you had created one, you can delete it) but we will configure the two routers differently.
Configure announcements. In the Services menu, then DHCPv6 Server & RA, choose the interface (LAN) then the Router Advertisements tab.
- Router mode: unmanaged will do just fine (read: the others won’t fix the problems),
- Router priority: high for the main and medium for the secondary (or medium for the main and low for the secondary),
- RA Interface: should not be displayed but if it is,
choose the local address of the router,
FE80::3:1andFE80::3:2, especially no VIP here), - DNS Configuration: you can enter the IP of your
firewalls (i.e.
2001:DB8:1234:5679::1and2001:DB8:1234:5679::2).
When a client machine requests it, and at regular intervals, your routers will announce themselves, but this time they will include their specific priority in their messages. The client machines will therefore see several gateways but will know that one should be used as a priority and only use the other if the first no longer announces itself or no longer responds.
Even if they don’t show you these priorities, that’s how Windows and Android work. They list the gateways for you but only use the main one as long as it responds and only switch to the secondary if the main one fails.
Linux on its side shows you the priorities but some distributions have problems to differentiate them.
To see the gateways and their priorities, you can use the following command:
ip -6 route showOn Centos 7-2009, and with our two routers, here’s a snippet (adapted to the example) of what you might get (I’ve removed the unreachable lines):
2001:DB8:1234:5679::/64 dev enp0s3 proto ra metric 100 pref medium
fe80::/64 dev enp0s3 proto kernel metric 100 pref medium
default via fe80::3:1 dev enp0s3 proto ra metric 100 pref high
default via fe80::3:2 dev enp0s3 proto ra metric 100 pref medium
We do have two default routes, each with a different router and their corresponding priority (high and medium).
On all other distros we’ve tested, you’ll get something like this (modified screenshot of an Ubuntu desktop 22.04):
::1 dev lo proto kernel metric 256 pref medium
2001:DB8:1234:5679::/64 dev enp0s3 proto ra metric 100 pref medium
fe80::/64 dev enp0s3 proto kernel metric 1024 pref medium
default proto ra metric 100 pref high
        nexthop via fe80::3:1 dev enp0s3 weight 1
        nexthop via fe80::3:2 dev enp0s3 weight 1
For these distributions, the two routers are grouped with the same preference (the highest received, here high). The kernel will therefore choose sometimes one (and the answers will come back), sometimes the other (and no answer will come back). You can check it with this command:
watch ping -c 1 -W 1 2600::1This watch command launches at regular intervals (every
two seconds) ping towards 2600::1 by sending
only one request (option -c 1) and by not waiting more than
one second to consider a failure (option -W 1). You will
then see sometimes a response received, sometimes no response received
depending on which gateway the kernel has decided to send your
requests.
For your information, here is the list of distributions we tested. For each of them, we setup a VirtualBox virtual machine with a network card in bridge access, then performed a default installation and, when necessary, we activated the network card (nothing more).
- Centos : 7-2009 ✅,
- Debian : 11.5 ❌,
- Ubuntu desktop : 22.04 ❌, 22.10 ❌, 20.04 ❌,
- Ubuntu Server : 22.04 ❌, 22.10 ❌, 20.04.4 ❌, 18.04.4 ❌,
- Mint : 21 Cinnamon ❌,
- Slackware : 15 amd64 ❌,
- Kali : 2022.4 ❌ (with an OVA from the official website),
- Open Mandriva Lx : platinium candidate plasma ❌,
- Gentoo : 2022-11-12 ❌ (live only because we weren’t able to install).
Notes about DNS
You might wonder why in the previous two solutions I advised you to put both routers in each of the listings.
After all, why couldn’t each router, advertising itself as a gateway, advertise itself as a DNS server? The other router doing the same to the client machines would know that there are two DNS servers and one could even imagine that the priorities are also managed for the DNS servers…
But Windows and Android will not like it because each announcement containing DNS information will replace the previous configuration (and not add to it). It follows that these two systems replace their DNS servers with each announcement received.
Hence my advice: the two routers announce all the DNS servers each time, your configurations will be all the more stable.
And after ?
Usually, it’s at this point in the article that I conclude with a “And then everything works, the problem is solved, here’s how to go further”. But not today…
We wanted to switch all the high availability configuration to IPv6 and we must admit that we did not succeed. First of all, the synchronization of firewall states can only be done in IPv4 (dont act, but it is not dramatic). Then, and this is especially where it hurts, the priorities on the gateways are not always taken care of (apart from Centos, Linux distributions manage it badly).
If the documentations and other online courses generally ignore IPv6 to give examples only with IPv4, it is perhaps because their authors do not know how IPv6 works but it is difficult to blame them given the discouraging problems and incompatibilities one encounters when one wants to make the effort to update oneself.